In a nutshell
- 🍋 Lemon peel under nails can lift surface stains thanks to its citric acid, which gently loosens pigment from keratin for visibly whiter tips.
- 🧪 Aim for controlled contact: buffer skin with petroleum jelly, apply peel to the free edge, and limit to 15–30 minutes (overnight is optional but higher risk).
- 🛡️ Prioritise safety: avoid use with eczema, cuts, or onycholysis; watch for irritation from limonene/citral; rinse after treatment and rehydrate with cuticle oil.
- 🧰 Smart alternatives include 3% hydrogen peroxide soaks, a brief baking soda paste, or denture tablets, plus gentle micro-buffing and a blue-tinted top coat to neutralise yellowing.
- ✨ Prevent new stains with a base coat, gloves for messy tasks, quick washes after tanning/spices, and consistent hydration—consistency beats intensity for healthy, bright tips.
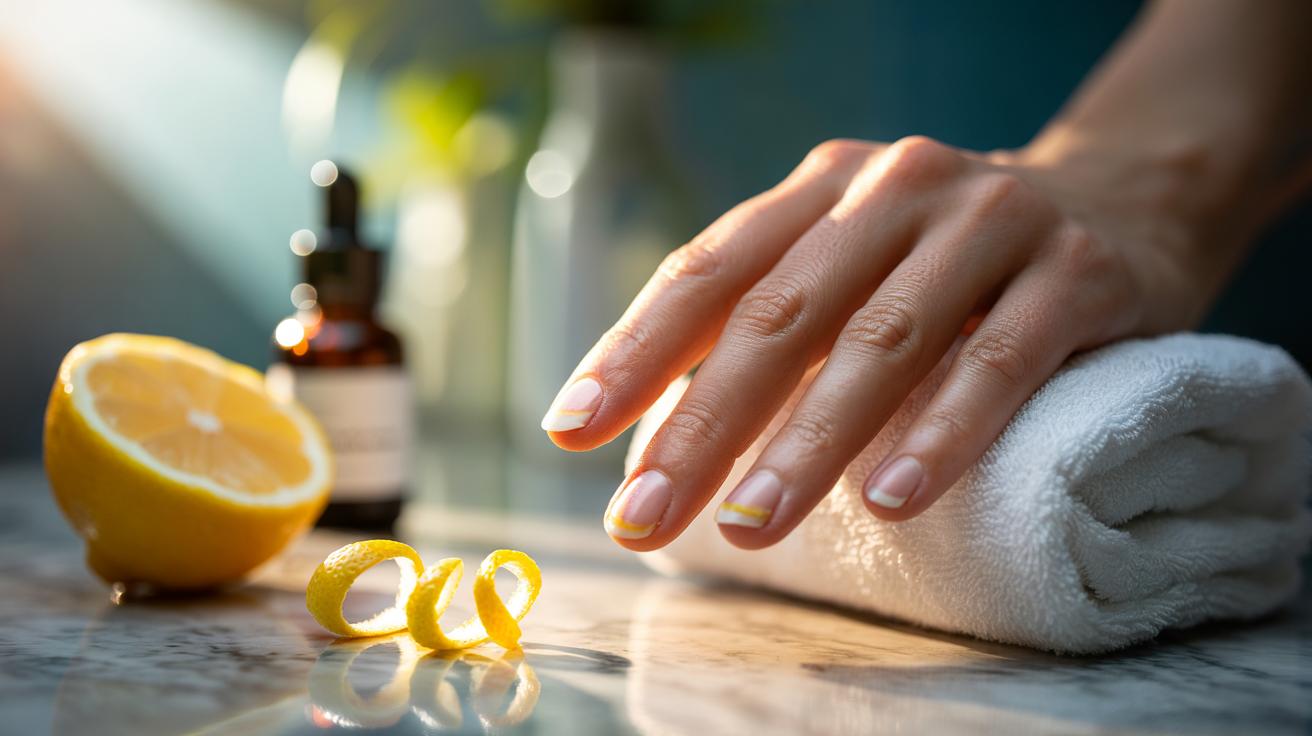
Lemon’s bright reputation as a natural cleaner extends to the tips of your fingers. Beauty forums are buzzing about placing lemon peel under nails to revive yellowed or stained edges overnight. The idea is simple: citric acid in the peel breaks down surface discolouration, leaving nails looking fresher by morning. As with many at-home hacks, the truth sits between chemistry and common sense. Citric acid can lift stains, but contact time and skin sensitivity are crucial. Here, we unpack how the acid works, who it suits, and the safest way to try it—alongside pro-approved alternatives that keep nails clean, bright, and resilient without compromising your cuticles.
The Chemistry: How Citric Acid Lifts Nail Stains
Nails are built from keratin, a sturdy protein that can trap pigments from polish, tobacco, curry, fake tan, and everyday grime. Lemon peel is rich in citric acid (pH around 2–3) and flavonoids. The acid acts as a mild chelating and desmolytic agent, loosening bonds between surface debris and the nail’s top layers while solubilising some metal-based pigments. Think of it as a gentle exfoliant for non-living keratin: it doesn’t bleach the nail like peroxide, but it can lift stains and increase reflectivity, which makes tips appear whiter.
Two factors matter: pH and dwell time. A low pH speeds stain release, yet increases the risk of dryness and sensitivity. Long, unbuffered exposure is unnecessary for most stains and can irritate surrounding skin. Oils within the peel—plus limonene in the zest—help soften residue but may also irritate sensitive hands. For many, 15–30 minutes of controlled contact is enough to see a cosmetic lift without flirting with brittleness.
Step-By-Step: Using Lemon Peel Under Nails Overnight
Start with clean, dry hands. Trim any loose hangnails and apply a thin ring of petroleum jelly or cuticle oil around the nail folds to buffer the skin. Slice a fresh lemon peel into slender crescents, pith-side facing the nail. Gently tease a sliver beneath the free edge so it contacts only the underside, not the living nail bed. For a light occlusion, slip on breathable cotton gloves. If this is your first time, test for 10–15 minutes before considering a longer wear.
While social media touts “overnight”, chemists and manicurists tend to favour caution. A practical compromise: 20–30 minutes in the evening, remove the peel, then rinse with lukewarm water. Follow with a drop of jojoba or squalane oil to rebalance lipids. Those determined to try overnight can reduce acidity by lightly rinsing the peel, patting it dry, and using the thinnest sliver. Discontinue immediately if you feel stinging, throbbing, or notice whitening of the surrounding skin.
Safety, Sensitivity, and When to Avoid the Hack
Citric acid is classed as a mild alpha-hydroxy acid, but nails and adjacent skin vary wildly in tolerance. If you have eczema, recent gel removal, onycholysis (lifting nails), or micro-cuts, skip this entirely. Do not use on broken skin or inflamed cuticles. Lemon’s limonene and citral can be allergens; repeated exposure elevates risk. Limit sessions to 2–3 times weekly, and always rehydrate with oil afterwards. Whitening is cosmetic—if discolouration stems from fungus or trauma, see a pharmacist or GP instead.
UV sensitivity is often discussed with citrus. While phototoxicity is largely linked to bergamot oil, not lemon, playing safe is wise: rinse thoroughly before daylight and apply hand cream with SPF if you’ll be outside. Signs you’ve overdone it include chalky patches, peeling around the nail folds, and increased snagging. If these appear, pause for a week and switch to gentler options.
| Agent | Typical pH/Strength | Contact Time | Best For | Key Precaution |
|---|---|---|---|---|
| Lemon (Citric Acid) | ~2–3 (natural) | 15–30 min | Surface stains | Can dry skin; patch test |
| Hydrogen Peroxide | 3% | 2–5 min soak | Deeper yellowing | Avoid cuts; rinse well |
| Baking Soda Paste | Alkaline slurry | 2–3 min | Neutralising odours | Abrasive; gentle use |
| Denture Tablets | Peroxide + enzymes | 5–10 min | Stubborn staining | Not daily; moisturise |
Results, Alternatives, and How to Keep Tips White
Expect a modest but visible improvement in tip brightness after a single well-timed session; entrenched stains may need a week of spaced treatments. Pair the process with micro-buffing (very fine grit, minimal pressure) to even the surface, then seal with a clear ridge-filler or blue-tinted top coat that optically cancels yellow. Hydration is non-negotiable—oils keep keratin flexible, resisting new micro-cracks that trap pigment. Smokers or heavy polish users benefit from a “rest week” every month without dark lacquers.
Prefer a lab-leaning route? Try a peroxide whitening pen, short soaks with 3% hydrogen peroxide diluted 1:1 with water, or a pea-sized bicarbonate paste applied with a cotton bud for two minutes, then rinsed. Preventive habits matter: base coat every time, gloves for cleaning and chopping turmeric, quick washes after fake tan. File nails to a shape that resists chipping; rough edges stain faster. Consistency, not intensity, delivers naturally white tips that look healthy and polished.
Lemon peel can be a fast, fragrant lift for dull tips when handled with care. The science of citric acid supports stain release, yet healthy nails depend on balanced routines that respect the skin around them. If you want overnight brightness, weigh contact time against sensitivity, and keep a moisturising step close at hand. Alternatives like peroxide pens or tinted top coats offer tidy shortcuts on busy days. What combination of gentle chemistry and smart prevention will you adopt to keep your nails clear, bright, and camera-ready all year?
Did you like it?4.5/5 (23)