In a nutshell
- 🍞 Rice-powered steam mimics pro ovens, delivering steady moisture for a shattering, golden crust via thermal mass and controlled release.
- 🔥 Step-by-step method: Preheat tray with 300–500 g rice; add 250–400 ml boiling water at loading; steam 15–20 min; finish dry for colour and crispness.
- 🧪 Science in action: Steam keeps the surface elastic for oven spring, starch gelatinisation precedes the Maillard reaction, then a dry phase locks in crunch.
- 🛠️ Smart tweaks: Use rice flour for non-stick, a rice bed to buffer base heat, and reuse dried grains; a table of measures keeps results repeatable.
- 🧭 Troubleshooting: Pale or leathery crusts signal heat/steam timing issues; adjust preheat, purge steam earlier, protect bases, and log weights and times for consistency.
Bakers whisper about secrets, but this one sits in your cupboard: rice. Used cleverly, it gives bread a golden crust that shatters under the knife and sings on the tongue. The method is simple, repeatable, and safe in a home oven. It’s all about controlled steam, delivered steadily from a tray of hot, hydrated rice while your loaf rises and colours. No fancy ovens, no burn-risk water splashes. Just grain, heat, and patience. The result is consistent bakery shine without expensive kit. If you’re chasing that glossy crackle and deep caramel notes, here’s how a handful of rice turns ordinary dough into a bakery-window loaf.
Why Rice Delivers a Perfect Crust
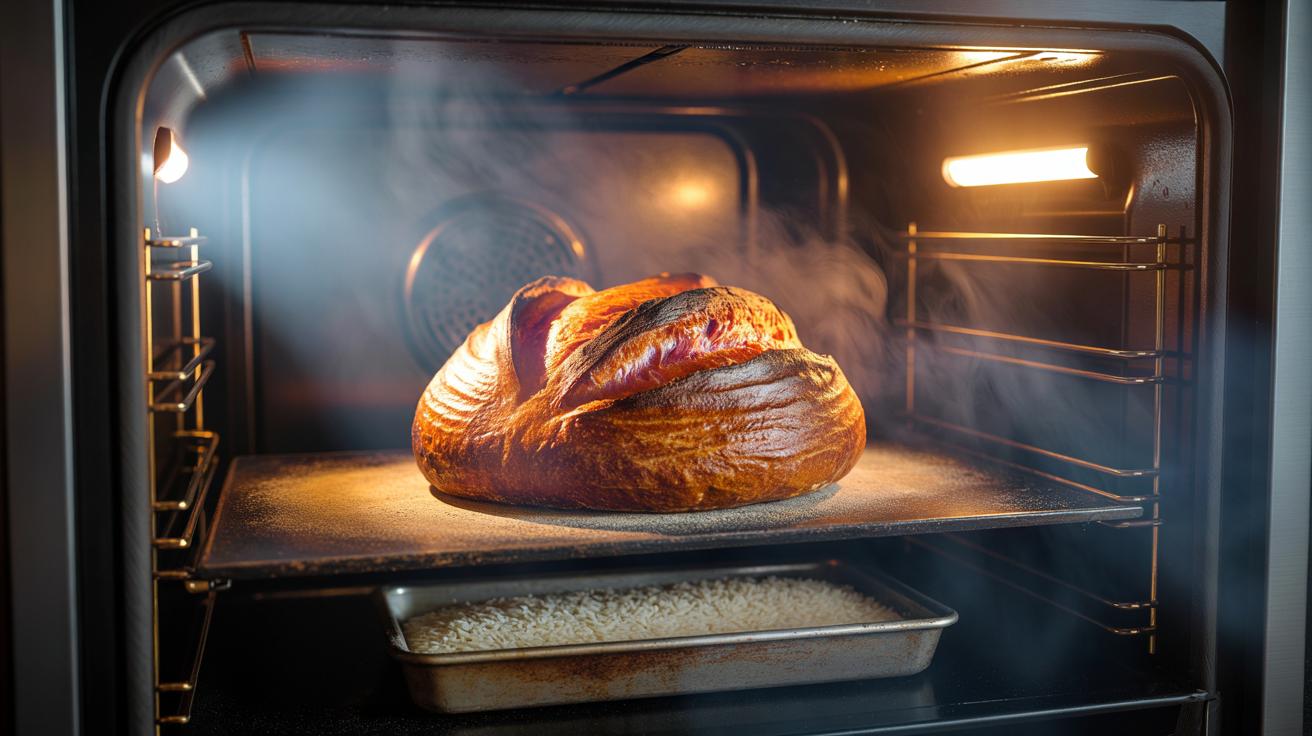
Professional deck ovens inject steam at the start of the bake. That moisture keeps the surface supple so the loaf can expand, then later evaporates to drive caramelisation. Rice replicates this reliably at home. Dry grains, preheated in a metal tray, act as a thermal mass. When you add boiling water, they soak and simmer, releasing gentle, sustained steam rather than a violent burst. That consistency matters. The dough’s surface starches gelatinise, forming a thin, glassy film that later turns brittle and golden as the Maillard reaction kicks in. Even, patient steam equals even, patient colour.
The rice also solves two common problems. First, it prevents warping and spitting that sometimes happens when water hits a hot empty tray; the grains cushion the pour. Second, it avoids flooding the oven floor with water, which can suppress temperature. Because the rice holds heat, you maintain a high deck temperature—vital for oven spring—while still supplying moisture. Compared with ice cubes, which can shock the oven and produce erratic steam, rice offers a calmer, longer release. It’s tidy, reusable, and cheap. A small investment of grains, a big return of crust.
Step-by-Step: The Rice-Steam Method
Preheat your oven to 240°C (465°F) with a sturdy metal tray on a lower shelf. Fill that tray with 300–500 g of uncooked rice; basmati, jasmine, or plain long-grain all work. The preheat needs time—at least 35 minutes—so the rice and metal become thoroughly hot. Shape, proof, and score your loaf as usual. Have a kettle of just-boiled water ready. Speed at this stage protects oven spring.
Slide the loaf onto a baking stone or preheated sheet. Immediately pour 250–400 ml of boiling water over the hot rice, closing the door swiftly to trap the steam. Bake with steam for 15–20 minutes, until the loaf has risen fully and the surface has set with a slight sheen. Then carefully remove the tray (or vent the oven by opening the door briefly) to purge moisture. Continue baking dry for 10–15 minutes to deepen colour and crispness. For extra snap, prop the door ajar for the final 3 minutes. Wet start, dry finish: that is the rhythm of great crust. Let the rice cool; it can be dried and reused many times.
Rice Flour, Rice Heat, and Other Smart Tweaks
Rice isn’t just for steam. A light dusting of rice flour on a banneton or cloth liner prevents sticking and yields a distinctive rustic speckle that survives the bake. Because rice flour lacks gluten, it won’t gum up damp dough, and it scorches less readily than wheat flour. You can also use a thin bed of dry rice under a Dutch oven to buffer the base heat, protecting against scorched bottoms in fierce ovens. Think of rice as a modular tool: it stores heat, metes out moisture, and manages contact. Below is a quick primer you can clip and keep.
| Tactic | Quantity | When to Use | Outcome |
|---|---|---|---|
| Dry rice + boiling water in tray | 300–500 g rice; 250–400 ml water | First 15–20 minutes of bake | Steady steam, bigger spring, gloss |
| Rice flour dusting | 2–3 tsp for banneton | Before final proof | No sticking, delicate speckled finish |
| Rice bed under Dutch oven | Handful to cover base | Hot ovens, dark pans | Protects base, avoids scorch rings |
| Reusing rice | Dry fully between bakes | Any time | Economical, consistent performance |
Small tweaks compound: steadier steam, cleaner release, better colour. Keep it simple, keep it repeatable.
Troubleshooting: Common Pitfalls and Fixes
Pale crust? Your oven may be too cool, or steam lasted too long. Ensure a full preheat and remove the rice tray after 15–20 minutes. Extend the dry phase, and don’t fear colour—caramelised sugars look deep, not burnt. If the crust is leathery, you released steam too late; start steaming as soon as the loaf goes in. Steam early, dry late. Soggy bottoms indicate trapped moisture: move the loaf to a higher rack, or finish directly on the oven shelf for the final 5 minutes. A scorched base suggests excessive bottom heat; use a rice buffer beneath a Dutch oven or double up trays.
Wrinkled crusts form when the loaf cools too quickly in humid air. Crack the oven door for a minute before removing, then cool on a rack. Overblown blisters come from very wet doughs and prolonged steam; reduce water poured on the rice by 50 ml and bake dry earlier. If scoring closes up, your blade may be dull or the dough under-proofed; sharpen and give the final proof five more minutes. Consistency wins: weigh rice and water, set timers, log results. Soon, the crust becomes predictable, and predictably glorious.
The rice trick isn’t a gimmick. It’s a practical, repeatable way to get professional sheen, bold colour, and that brittle, musical crackle home ovens rarely provide. It scales to any loaf, from lean sourdough to seeded tins, and the grains pay for themselves over dozens of bakes. Once you hear the crust sing as it cools, you won’t go back. Now that you know how rice manages heat and moisture, what variation will you try first—steam for a blistered bâtard, a rice-flour kiss on a country loaf, or a rice bed to save your crust from a too-hot base?
Did you like it?4.5/5 (22)