In a nutshell
- 🥛 Use the 10-second milk rescue: brush 1–2 tsp whole milk on the slice, microwave on medium power for 8–12 seconds, rest 10 seconds, then add 3–5 seconds only if needed for a soft, springy crumb.
- 🧪 Understand the science: dryness comes from starch retrogradation; milk delivers water, lactose, and fat while microwaves energise water molecules, so short bursts relax the crumb without turning it rubbery.
- 📊 Adjust by cake type: plain sponge (1–2 tsp, 8–12 s), chocolate (2 tsp, 10–12 s), loaf/banana (2–3 tsp, 12–15 s), frosted slices (shield and use very short bursts) for best texture and gloss.
- ⚠️ Avoid pitfalls and tweak smartly: don’t drench the cake or blast at full power; protect delicate frosting; try evaporated or oat milk, a teaspoon of coffee for chocolate, or a touch of simple syrup for lean sponges.
- 🧊 Prevent future staling: wrap tightly, use soaking syrup in layers, freeze surplus within 24 hours, use bread-as-humidity-buffer in tins, and remember staling = moisture migration, not just drying.
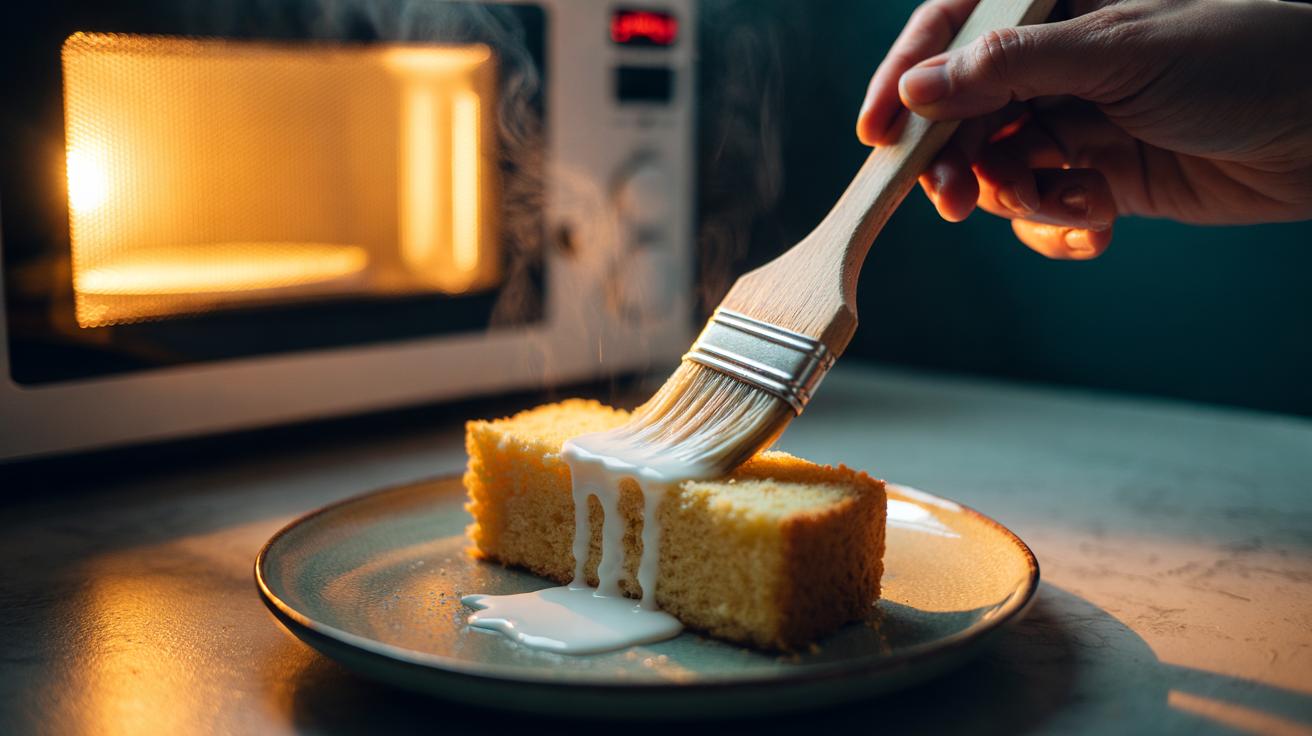
You know the scene. A beautiful sponge baked yesterday sits on the counter, now sulking into dryness, its once-tender crumb tough as a train seat. Don’t bin it. Don’t drown it in custard. There’s a faster, smarter fix: milk and a brief kiss of heat. In just 10 seconds, moisture roars back, crumb loosens, and aroma blooms. It feels like cheating. It’s chemistry. This quick rescue won’t just save dessert; it preserves the baker’s pride and the cake’s character. Ten seconds is enough to wake a stale crumb without cooking it. Here’s how and why it works, plus the tricks that make it bulletproof.
The Science Behind Ten-Second Moisture
Dry cake isn’t a moral failing; it’s starch retrogradation. After baking, gelatinised starches gradually realign and expel water. Crumbs feel firm, even squeaky. Add gentle heat and a touch of water–fat–sugar from milk, and the network relaxes. Water migrates back into starch and protein. Fats soften. The hygroscopic sugars grab and hold moisture. In a microwave, water molecules vibrate rapidly, delivering heat straight into the crumb rather than the air.
Milk is a multi-tool. It carries water for rehydration, lactose to sweeten and attract moisture, and milk fat to lubricate starch–protein junctions. Those fractions slip into the cake’s capillaries fast. That’s why seconds suffice. Short bursts restore tenderness without turning the slice rubbery. Too little time and nothing happens; too much and steam drives moisture out again. Strike the balance and that plain slice returns to fragrant, bouncy life with astonishing reliability.
Step-by-Step: The 10-Second Milk Rescue
Start small. Work with a single slice or a neat wedge. Place it on a microwave-safe plate. Dab or lightly brush 1–2 teaspoons of whole milk on the cut faces and the base; avoid soaking the crust. For cupcakes, use ½–1 teaspoon. Microwave on medium power for 8–12 seconds. Rest 10 seconds to let heat distribute. Test with a fingertip: springy, warm, aromatic. Need a touch more? Add 3–5 seconds only. The goal is pliable crumb, not a hot sponge pudding. If frosting is delicate, shield it with baking paper or warm the slice upside down.
| Cake Type | Milk Amount | Heat Method | Time | Expected Result |
|---|---|---|---|---|
| Plain sponge | 1–2 tsp | Microwave, medium | 8–12 s | Softer crumb, revived aroma |
| Chocolate cake | 2 tsp | Microwave, medium | 10–12 s | Glossy, fudgier mouthfeel |
| Loaf/banana | 2–3 tsp | Microwave, medium-low | 12–15 s | Moist slice, intact structure |
| Frosted slice | 1 tsp | Microwave in short bursts | 2×5 s | Crumb softened, frosting stable |
No microwave? Wrap the slice in baking paper, sprinkle milk, and warm in a low oven (150°C) for 3–5 minutes. It’s slower but gentler on icings. Either way, eat promptly; the effect is transient.
Mistakes to Avoid and Smart Variations
Common error number one: too much milk. Drenching turns the outer crumb gluey before heat can spread. Less is more. Number two: blasting at full power. High wattage creates steam pockets, toughening proteins at the edges while the centre stays dry. Use medium power, short bursts. Watch the frosting—cream cheese, meringue and buttercreams don’t love heat. Shield or slice off, treat the cake, then replace. If the cake is fridge-cold, let it sit five minutes before warming to avoid temperature shock.
Variations help. Try evaporated milk for richness and slightly caramel notes, or oat milk for a neutral plant-based option with decent body. Almond milk is lighter; brush sparingly. A teaspoon of simple syrup under the milk boosts moisture retention on very lean sponges. Chocolate cake sings with 1 teaspoon of warm coffee plus milk. Add a micro-pinch of salt to the milk for flavour lift. And if the crumb is cracked and crumbly, sandwich slices briefly in parchment after heating; the trapped vapour evens things out.
Beyond the Microwave: Texture Insurance for Tomorrow
The best rescue is prevention. Once the cake cools, trap moisture where it belongs. Wrap snugly in baking paper, then cling film, or store in an airtight tin. For layer cakes, brush soaking syrup (equal parts sugar and water, cooled) onto layers during assembly; it’s a pro’s secret against staling. Freeze surplus slices within 24 hours—double-wrapped, they thaw to near-fresh in under an hour. Slice-to-order keeps the interior protected longer than presenting a cut face to the air.
Kitchen hacks work, sensibly applied. Park a clean slice of fresh bread beside the cake in the tin; the bread donates moisture. Replace it daily. Avoid apple slices—they perfume and can encourage condensation. If you must refrigerate (cream fillings), press cling film gently to the cut surfaces to minimise evaporation. For cupcakes, cap them with upturned cups inside a tin to reduce air volume. And remember: staling is about moisture migration, not “drying out” alone. Managing that movement—during cooling, storage, and reheating—is the whole game.
In ten honest seconds, a little milk can reverse hours of staling and rescue a tea-time treat, no drama, no special kit. It’s quick, cheap, and wonderfully forgiving, provided you respect the crumb and keep the bursts short. That’s the charm: kitchen physics you can taste. Next time a cake sulks on the sideboard, reach for the milk jug and the microwave, not the bin. What flavour will you revive first—and what twist will you try to make the rescue your own?
Did you like it?4.5/5 (22)