In a nutshell
- 🍫 A 90-second microwave mug brownie that’s reliably fudgy, made with self-raising flour, unsweetened cocoa, sugar, and oil—with no eggs for a plush texture.
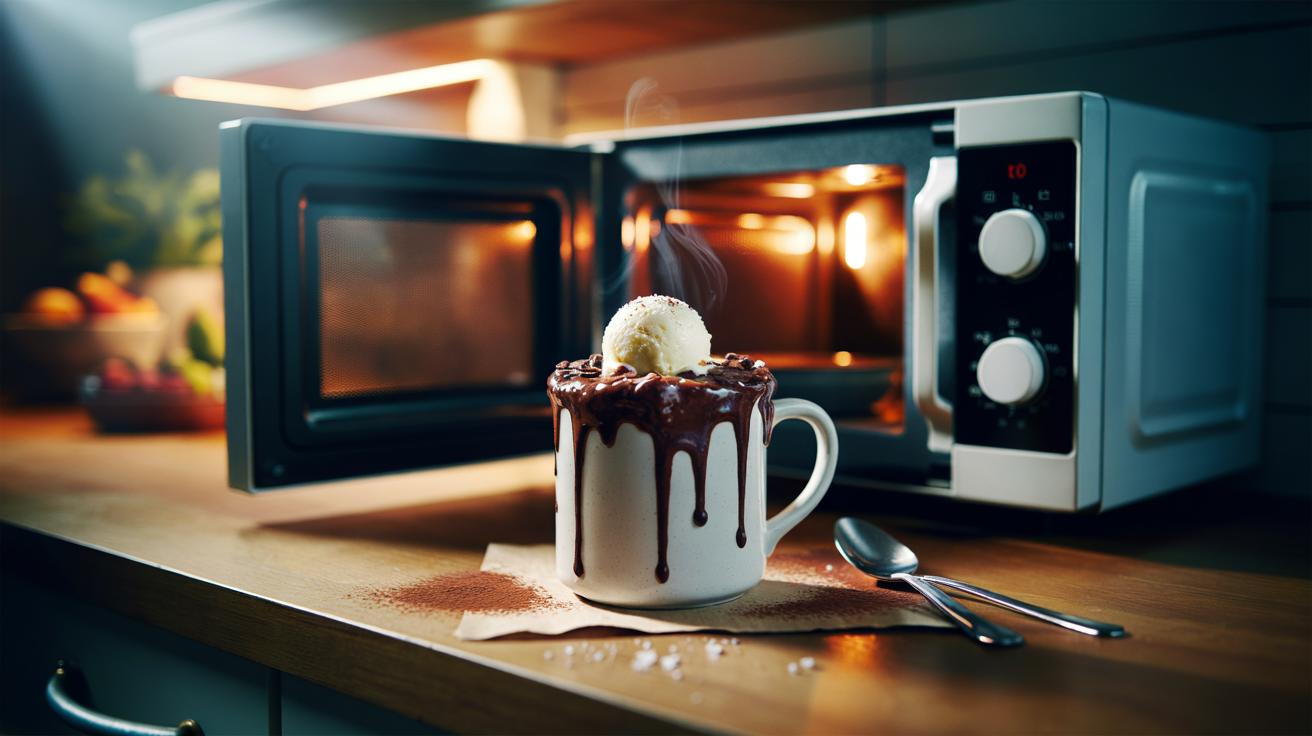
- ☕ Use a microwave-safe 300–350 ml mug, mix the batter until glossy right in the cup, and keep it under halfway full to prevent overflow and ensure even cooking.
- ⏱️ Cook on High: about 60–70s at 800W or 45–55s at 1000W; stop when edges set and the centre stays slightly glossy, then rest 30–60s to finish gently.
- 🔬 It works thanks to balanced dry-to-liquid ratios, oil that stays fluid for tenderness, and self-raising flour for lift without gumminess, delivering a brownie—not a cake.
- 🎨 Flexible variations: vegan and gluten-free swaps, espresso or orange zest for depth, peanut butter or tahini swirls, nuts or chips; finish with sea salt, ice cream, or yoghurt.
British kitchens have a soft spot for speedy bakes, and few are as satisfying as the microwave mug brownie. Designed for late-night cravings and last-minute comfort, this single-serve marvel is ready in 90 seconds and engineered to be dependable. After testing across a range of domestic microwaves, the result is a fudgy, chocolate-rich brownie with a molten middle and a lightly set rim. The secret is a smart balance of self-raising flour, cocoa, sugar, and oil—ingredients most of us already have—stirred with a spoon in the very mug you’ll eat from. No scales? No problem. No oven? You won’t miss it. And with a few careful cues, it truly never fails.
Ingredients and Equipment
Choose a sturdy, microwave-safe mug of around 300–350 ml capacity; a wider shape encourages even heating and reduces overflow risk. You only need a spoon, but a mini whisk gives a smoother batter. For consistency, level your tablespoons with a straight edge. The flavour backbone is unsweetened cocoa; the lift comes from self-raising flour. Use neutral oil for tenderness and a glossy crumb. Caster sugar melts quickly, helping that signature fudgy chew. A few chocolate chips turn the centre decadently molten, and a pinch of fine salt sharpens the cocoa’s bitter-sweet balance.
| Ingredient | Amount | Purpose | Substitution |
|---|---|---|---|
| Self-raising flour | 3 tbsp (about 25 g) | Structure and lift | Plain flour + 1/8 tsp baking powder |
| Unsweetened cocoa powder | 1½ tbsp (about 12 g) | Chocolate flavour and colour | Dutch-processed cocoa |
| Caster sugar | 3 tbsp (about 40 g) | Sweetness and moisture | Soft light brown sugar |
| Fine salt | Pinch | Balances sweetness | Sea salt flakes, crushed |
| Milk (dairy or plant) | 3 tbsp (45 ml) | Liquid for batter | Oat or almond milk |
| Neutral oil | 2 tbsp (30 ml) | Tender crumb | Light olive or melted coconut oil |
| Vanilla extract | ¼ tsp | Aroma | Instant espresso pinch |
| Chocolate chips (optional) | 1 tbsp | Molten pockets | Chopped dark chocolate |
Use room-temperature milk for a smoother emulsion and a more even rise. Oil outruns butter here because it stays liquid after cooking, guaranteeing a soft bite. No eggs required: leaving them out keeps the texture plush, not rubbery. If you’re dairy-free or vegan, plant milk and dark chocolate chips make this naturally suitable without fuss. Keep the mug half-filled once mixed; it needs headroom to bubble, rise, and settle without spilling.
The 90-Second Method, Step by Step
Add flour, cocoa, sugar, and a pinch of salt directly to the mug and stir until the colour is uniform. Pour in milk, oil, and vanilla, then mix thoroughly, scraping right into the mug’s base and corners. You’re chasing a thick, glossy batter with no dry pockets. Fold in chocolate chips if using. Consistency matters: a smooth batter cooks evenly and stays fudgy.
Microwave on High, adjusting for your appliance. At 800 W, start with 60–70 seconds; at 1000 W, 45–55 seconds is typical. Watch for visual cues: the top puffs and looks set at the edges while the centre remains slightly glossy. If needed, continue in 10‑second bursts. Stop when the middle is just underdone—carryover heat will finish the job without tipping into dryness.
Let the brownie rest for 30–60 seconds to settle. This brief pause firms the crumb while preserving a molten seam in the centre. Finish with a tiny pinch of sea salt flakes, a scoop of vanilla ice cream, or a spoon of thick Greek yoghurt for a hot–cold contrast that amplifies the chocolate.
Why It Works: Texture, Heat, and Ratios
This recipe leans on a simple balance: roughly equal parts dry ingredients to liquid and fat. Sugar draws moisture, keeping the crumb soft; cocoa brings flavour and fat without the heaviness of butter. Oil delivers tenderness because it remains fluid as the brownie cools. Self-raising flour adds a measured lift that prevents gumminess but avoids a spongy, over-aerated structure. It’s a brownie, not a cake—density is the point.
Microwaves excite water molecules, so the batter heats from within. That’s why mug shape, batter thickness, and rest time matter. A wider mug spreads heat and limits overcooking at the core. The glossy centre signals enough free moisture to finish cooking off-heat, creating that velvet interior. Salt sharpens cocoa’s bitterness; vanilla rounds the edges. The short rest is non-negotiable: it sets starches, concentrates flavour, and locks in the molten middle without toughening.
Variations, Toppings, and Serving Ideas
Dial the brownie to your mood. For a vegan take, stick with plant milk and dark chocolate chips. For gluten-free, swap in a trusted 1:1 flour blend with a pinch more baking powder. Add a half teaspoon of instant espresso for depth, a scrape of orange zest for brightness, or swirl in a teaspoon of peanut butter or tahini for savoury-sweet intrigue. Stir through chopped walnuts for bite, or crumble a biscuit on top for crunch. A few flakes of sea salt instantly sharpen the chocolate.
Serve with ice cream, custard, crème fraîche, or berries. A drizzle of warm chocolate sauce turns it dinner-party worthy; a spoon of cherry jam makes a Black Forest nod. For sharing, split the batter into two small ramekins and cook 35–45 seconds each. If scaling up, cook one mug at a time for consistency. Never fill the mug more than halfway—the rise and bubble need space to prevent spills and ensure an even set.
In a world of overcomplicated desserts, this 90-second mug brownie proves that pleasure can be precise, unfussy, and immediate. With the right mug, a measured stir, and a watchful eye, you’ll get fudgy-centred results every time. Keep cocoa in the cupboard, oil by the hob, and a handful of chocolate chips at the ready, and you’ve always got a solo pudding on standby. What twist will you try first: citrus zest and espresso for a grown-up kick, or a nostalgic peanut butter swirl crowned with ice cream?
Did you like it?4.8/5 (22)