In a nutshell
- 🧄 A 15-second garlic peeling hack uses a rubber band tension twist to strip skins swiftly, leaving intact cloves with less mess and smell.
- ⏱️ Clear steps: trim stem, loop band mid‑clove, apply a 30–60° counter‑twist, slide, repeat; keep tools dry; expect 10–15 seconds per clove without bruising.
- 🧰 Method match-up: the tension twist preserves texture better than jar shaking or knife crushing; table outlines pros, cons, and timing versus microwave and silicone tubes.
- 🧼 Hygiene and aroma control: use a food‑safe, cleaned band, work on a sanitised board, quick-rinse peeled cloves, and reduce odour with stainless steel or lemon.
- 🌱 Sustainability: choose reusable gear, turn garlic skins into seasoning or stock, and compost leftovers to cut waste and kitchen clutter.
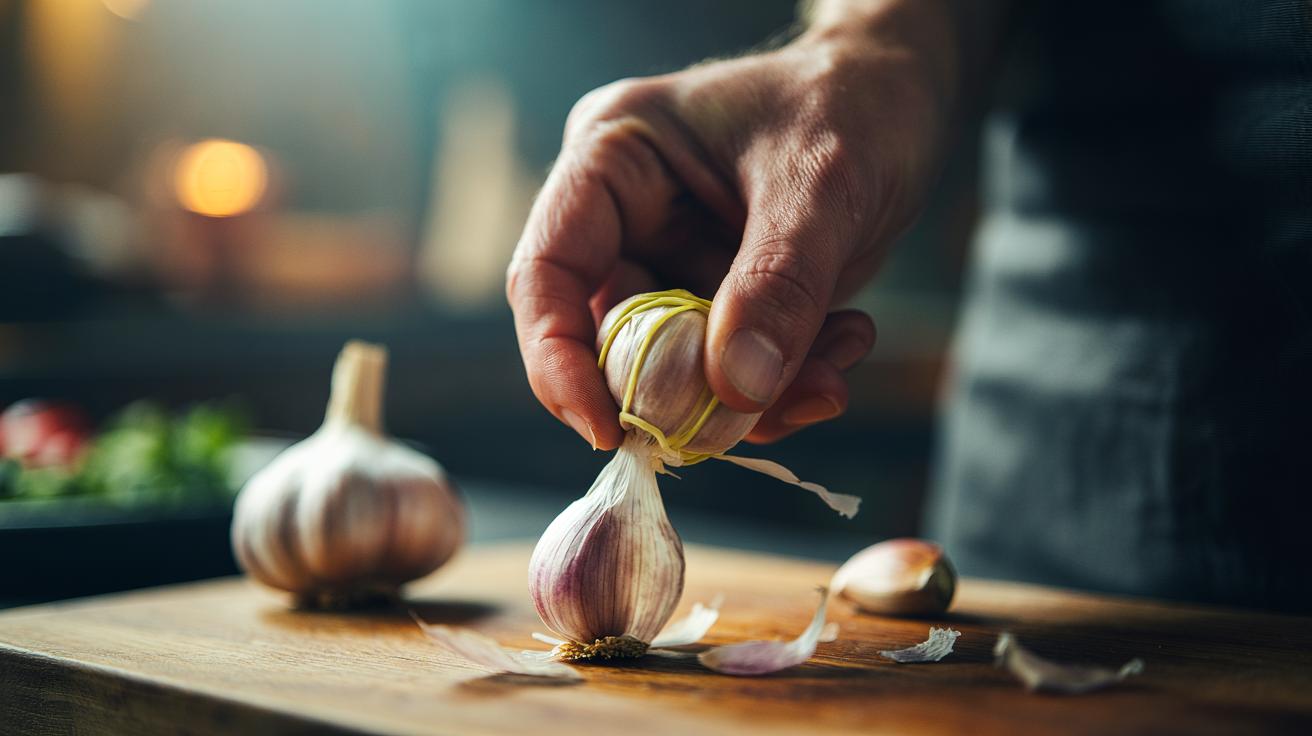
Kitchen tricks don’t need gadgets to shine. This week’s viral tip is a 15‑second garlic peeling hack that relies on a simple rubber band and a clever dose of tension. By creating a quick twist against the clove, you harness friction so the papery skin slips free with barely any mess. No knife required, and your fingers pick up less lingering smell. For batch cooking, it’s surprisingly efficient: a handful of cloves go from bulb to pan-ready in moments. Below, we unpack the science, provide a clear method, and compare it with kitchen stalwarts so you can decide if this tension twist deserves a permanent spot in your culinary routine.
How the Rubber Band Tension Twist Works
The trick is all about controlled friction and torsion. Wrap a broad, clean rubber band around the clove, then twist in one direction while your other hand gently counters. The band grips the skin while the clove resists, creating shear along the papery layers. Those layers detach, and the skin slides off in one tidy movement. Skins separate in a single twist, leaving the clove intact and largely unbruised.
Why it’s fast: garlic skin is brittle and weakly attached; it hates lateral tension. The band’s elasticity distributes pressure evenly, so you don’t crush the flesh as a knife smash might. Keep cloves intact for finer slicing and even sautéing. Less bruising also means fewer ruptured cells and a milder initial aroma cloud in your kitchen.
Choose a band about 5–8 mm wide for better grip. Very thin bands dig in and tear; very thick ones slip. A light twist of 30–60 degrees is enough. Stop as soon as the skin loosens, then pull it away—don’t over‑twist or you’ll nick the clove and waste its juices.
Step-By-Step Guide to the 15-Second Peel
1) Separate cloves from the bulb and trim the tough stem end by 1–2 mm—this exposes a weak edge. 2) Loop a clean, dry rubber band around the clove’s midsection. 3) Grip the clove lightly between thumb and forefinger. With the other hand, twist the band clockwise as your clove hand counters anti‑clockwise. You’re aiming for a firm, short tension twist that scuffs the paper. Think “twist-and-release,” not “wring-it-dry”.
As the skin lifts, slide the band toward the tip and repeat a micro‑twist. Peel away the loosened layer; if a stubborn patch remains near the root, roll the band there and twist once more. For batch peeling, line up five cloves and work down the row—twist, slide, peel, next. Expect a peel‑per‑clove rhythm of roughly 10–15 seconds once you get the motion.
Pro tips: keep both clove and band dry for grip; damp paper clings. If skins are leathery, give the cloves a 30‑second air rest after trimming to let edges lift. Swap bands when they lose snap. Garlic peel sticks to static surfaces, so peel over a board, not a tea towel.
Comparing Garlic Peeling Methods
The rubber band approach competes with classics: jar shaking, knife crushing, a microwave burst, silicone tubes. Each has a niche. If you want intact cloves for precise slicing, the tension twist stands out. If you need volume for roast trays, a jar works well but bruises more. Microwave heat loosens skins but warms cloves and can dull flavour edges. Below is a snapshot to help you choose the right tool for the moment.
| Method | Time per clove | Pros | Cons |
|---|---|---|---|
| Rubber Band Twist | 10–15 s | Intact cloves; low mess; no heat | Needs the right band; small learning curve |
| Jar Shake | 1–2 s (batch) | Great for volume | Bruises; noisy; stray skins everywhere |
| Knife Crush | 5–8 s | Fast; universal tool | Flattens cloves; risk to fingers |
| Microwave Burst | 15–30 s | Loosens stubborn skins | Heats cloves; uneven results |
| Silicone Tube | 8–12 s | Efficient; clean roll | Requires extra gadget |
If you prize texture and aroma control, choose a method that avoids crushing and heat. The tension twist wins there. For meal prep marathons, a jar or silicone tube is faster, though you’ll trade neatness. Many cooks keep both options: twist for delicate dishes, batch methods for stews and roasts.
Food Safety, Aroma Control, and Waste Reduction
Cleanliness matters. Use a food‑safe, unpowdered rubber band and wash it with hot, soapy water before first use; air‑dry flat so it doesn’t crack. Always peel on a sanitised board to prevent cross‑contamination. The twist is gentler than a smash, which reduces splatter and keeps raw garlic juices off your hands and handles.
For odour control, rinse peeled cloves quickly under cold water after twisting; it carries away loosened membrane without washing out flavour. To minimise lingering smells, rub fingers on stainless steel under running water or use a lemon slice. Intact cloves release fewer volatiles on the board, which helps if you’re prepping multiple aromatics in sequence.
Don’t bin the skins: they’re aromatic. Dry them in a low oven and crush into a seasoning salt, or simmer in stock for a subtle savoury lift. Composting is a fine fallback. Replacing disposable gadgets with a reusable band also trims clutter. Small choices like these build a more sustainable kitchen routine without sacrificing speed.
The 15‑second garlic peeling hack works because it turns elasticity into effortless grip, saving time while keeping cloves pristine. It’s tidy enough for midweek cooking and precise enough for dishes where texture counts. Once you learn the feel of that short tension twist, it becomes second nature. No special tools, no noise, no bruised cloves—just clean, ready garlic. Will you put a rubber band by your chopping board and test this against your usual method, or will another technique win in your kitchen trials?
Did you like it?4.6/5 (27)