In a nutshell
- 🔥 Aluminium foil provides a conductive, reflective surface that spreads heat evenly, taming hotspots for uniform cookies in minutes.
- ✨ Use shiny side up to reflect radiant heat and moderate base browning; dull side absorbs slightly more, encouraging quicker colour.
- 🧭 Line and bake smart: heavy-duty foil, middle rack, full preheat, rotate halfway, then rest 2 minutes for carryover heat to set centres without drying.
- 🥇 For control, double-pan if bottoms darken too fast, and match surface to style—foil for crisp edges, parchment for a softer base.
- 📊 Tune results: adjust temperature and time (lower for plush, higher for crisp), space scoops about 5 cm, and use adequate fat or a light oil to prevent sticking on foil.
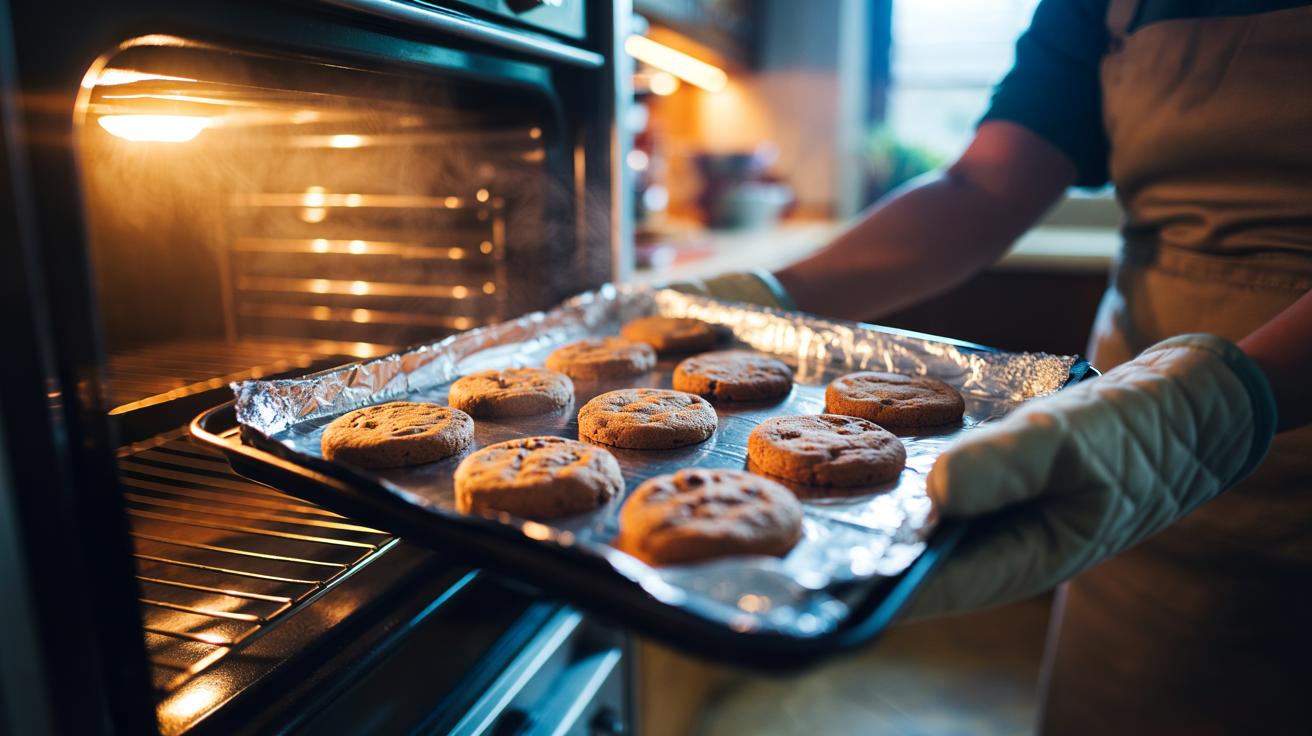
Nothing beats the scent of freshly baked cookies, edges just turning gold while the middle stays tender. Swap parchment for aluminium foil and you’ll harness faster, more even heat transfer across your tray. Foil’s smooth, reflective surface helps tame hotspots and spread warmth, giving dough a prompt, uniform rise and a crisp finish where you want it. Because the foil conforms to the tray and reflects radiant heat, cookies can set evenly in minutes, with fewer burnt bottoms and patchy bakes. For weeknight treats or a weekend batch, this simple lining trick offers professional consistency without special kit.
Why Aluminium Foil Evens Heat on a Baking Tray
Foil acts as a conductive interface between metal tray and dough, promoting even energy flow. The sheet presses flat, eliminating micro-gaps where air could insulate parts of the base. That contact delivers steady heat to every cookie, smoothing out the “hot ring” effect that often occurs near tray edges. The result is consistent browning, centre-to-edge, with fewer rogue cookies racing ahead or lagging behind. In electric ovens, where radiant energy dominates, the foil’s reflectivity also moderates bursty heat, keeping sugars from scorching before the crumb sets.
Thermally, two factors help: emissivity and distribution. The shiny surface has relatively low emissivity, so it reflects a portion of radiant heat back upward, stabilising surface temperature and reducing the risk of hotspots. Meanwhile, the foil’s thinness lets it respond rapidly to oven changes, smoothing out temperature swings as you open the door or rotate the tray. Because the foil equalises contact and manages radiation, you get predictable spread and texture, particularly valuable for butter-rich doughs that can puddle under uneven heat.
How to Line, Load, and Bake for Consistent Cookies
Start with a rimmed baking sheet. Tear a piece of heavy-duty foil slightly larger than the tray, lightly crumple it, then smooth it flat to create micro-ridges. This subtle texture lifts cookies just enough to reduce sticking while maintaining close contact. Place foil shiny side up and anchor the edges under the rim. Preheat fully—most batches bake best at 170–190°C fan (190–200°C conventional)—and let the tray warm for a minute to stabilise.
Portion dough evenly, spacing at least 5 cm apart. For classic chocolate chip, 35–45 g scoops give a balanced chew and spread. If you prefer thicker cookies, chill dough for 30 minutes to slow melt. Bake on the middle rack to balance top and bottom heat. Rotate the tray halfway through for truly even colour, especially in older ovens with known hot corners.
Watch cues, not just the clock: edges should be set and lightly bronze; centres a shade paler and still soft. Allow 2 minutes’ rest on the foil to finish carryover cooking, then transfer to a rack. Carryover heat is your friend here, firming the crumb without drying it out. If bottoms darken too fast, double-pan: place the lined tray atop a second, inverted sheet to buffer direct heat.
Shiny Side, Dull Side, and the Science of Surface
The shiny/dull split comes from the final rolling step in manufacturing; it’s not a coating. The performance difference is modest, yet worth understanding. Shiny side up reflects a touch more radiant heat, moderating browning on the base. Dull side up absorbs slightly more, encouraging quicker colour. In most home ovens the gap is small, but with sugary doughs that caramelise rapidly, shiny-up helps protect bottoms while the tops set.
Foil vs parchment? Parchment is a better non-stick and slightly insulating surface; it promotes softer bottoms and slower edges. Foil runs hotter, driving quicker set and crisper edges, ideal for thin-and-crispy styles. To avoid sticking on foil, use doughs with adequate fat, or give the foil a whisper of neutral oil. If you love a blond base, buffer with a second sheet or reduce the rack one notch. Match surface to style: foil for snap, parchment for plush.
Practical Settings and Quick Reference
Foil is flexible across styles, but a few dialled-in settings make it sing. For chewy-centre cookies, bake at 180°C fan (195°C conventional) for 9–12 minutes, removing while the middle still looks slightly under. For thin, lacy cookies, raise heat 5–10°C and shorten the bake to capture crispness before the sugars over-darken. Always preheat fully and avoid overcrowding the oven, which drops temperature and elongates bake time. If your oven runs hot, opt for shiny side up and double-pan for extra control.
Use this quick table to calibrate your approach based on dough style and desired texture. Keep notes—small changes to temperature or pan setup yield meaningful differences in spread, shine, and snap.
| Parameter | Recommendation | Why It Helps |
|---|---|---|
| Foil Orientation | Shiny side up for gentler base browning | Reflects radiant heat, reducing scorching |
| Pan Setup | Double-pan if bottoms darken fast | Buffers direct conduction for even colour |
| Oven Position | Middle rack; rotate halfway | Balances top/bottom heat, evens hotspots |
| Texture Target | Lower temp for plush; higher for crisp | Controls spread and caramelisation rate |
| Release | Rest 2 minutes, then rack | Carryover firms crumb without drying |
With a single sheet of aluminium foil, your baking tray becomes a smarter surface: quick to heat, steady in output, and forgiving over a busy batch. The shiny face reflects just enough energy to guard bases, while close contact encourages an even bake and a clean lift. In minutes, you’ll coax deep flavour and defined edges without the usual roulette of hot spots. Whether you chase café-thin snap or bakery-chewy middle, these tweaks push you closer to your ideal. What will you test first: a double-pan for perfect blond bases, or a hotter, shorter bake for irresistible crunch?
Did you like it?4.5/5 (27)