In a nutshell
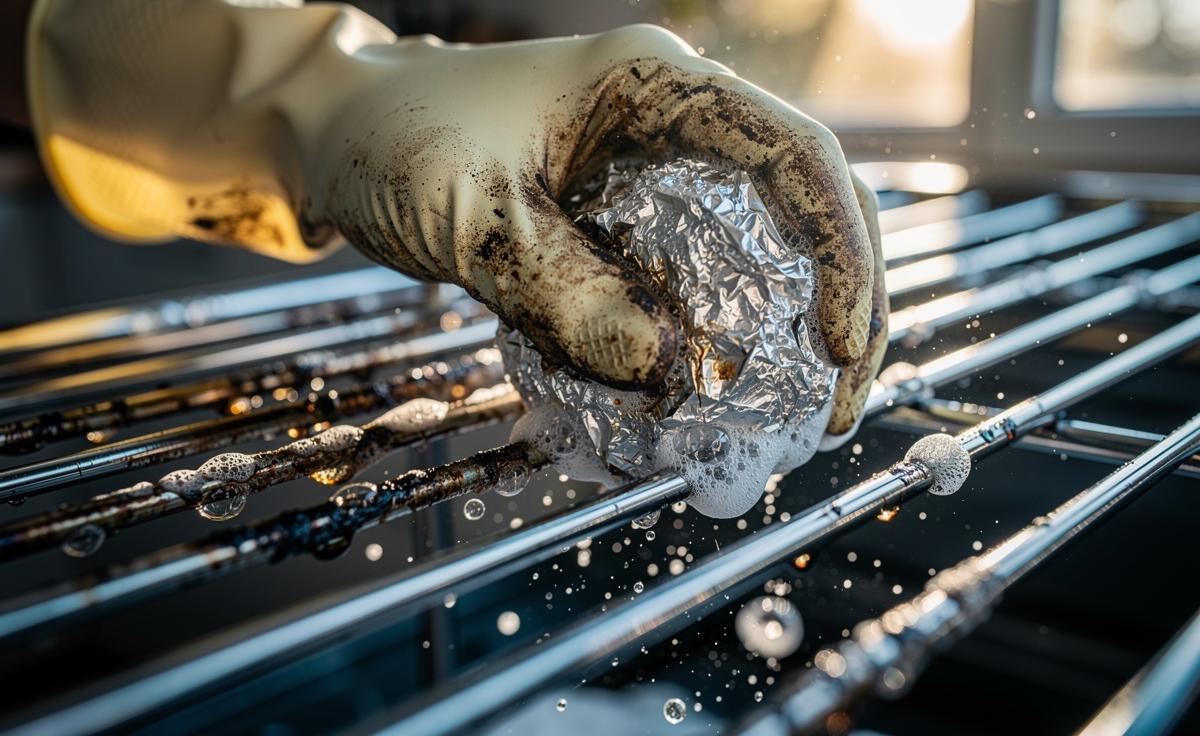
- 🔥 Aluminium foil ball acts as a fine abrasive via its oxide micro-edges, lifting burnt grease when lubricated with water/soap; avoid use on non-stick or self-clean coated racks.
- ⏱️ Follow the 10-minute method: warm racks with hot water, add dish soap, crumple a dense foil ball, use short strokes to break crust then long sweeps, rotate the ball, rinse, and dry.
- 🧪 Pair foil with safe solutions: hot water + dish soap (1 tsp/litre), baking soda paste for stubborn spots, and a diluted vinegar spritz to finish; never mix bleach with acids or soak foil in vinegar.
- 🛡️ Prioritise safety: confirm chrome-plated steel before scrubbing, wear gloves, protect drains with a strainer, keep foil from heating elements, and recycle clean foil where accepted.
- ✨ Benefits: fast, low-cost, fewer harsh chemicals, controlled abrasion that preserves finish, and racks that look freshly polished after a single focused session.
There’s a fast, low-cost way to revive grimy oven racks without harsh fumes or an all-day soak. It uses something already in your drawer: aluminium foil. When formed into a tight ball, foil becomes a surprisingly effective micro-scrubber that lifts burnt grease and carbon in minutes. The trick relies on controlled abrasion and a little chemistry, not brute force. Done properly, it won’t gouge chrome-plated metal and doesn’t need power cleaning products. You’ll combine warm water, a mild cleaner, and the right pressure. Ten minutes, one simple tool, and the kind of gleam that makes the whole cooker feel new again.
Why Aluminium Foil Works on Burnt Grease
At first glance, a crumpled foil ball looks crude. In practice, it’s elegant. Aluminium forms a thin oxide layer that’s hard and grippy, creating countless edges that function like a fine abrasive pad. Those microscopic ridges bite into carbonised fat and polymerised sugars, which are brittle compared with the underlying metal, so the grime fractures and flakes away. The key is lubrication. A film of water or soapy solution lets the foil glide, reducing friction on the rack while maintaining bite on the residue.
Chrome-plated racks are robust enough for this method because their surface hardness resists light abrasion. The foil’s hardness sits below steel wool but above baked-on residues, making it a smart middle ground. You’re not sanding; you’re micro-chipping. The ball’s shape spreads pressure, yet the creases concentrate force where needed. Short, controlled strokes target stubborn patches. Longer passes finish and blend. Grease lines along the rungs lift fast because the edges meet them head-on.
There are limits. Do not use foil on non-stick-coated or graphite-grey “self-clean” racks supplied with some ovens. Those coatings are designed to self-oxidise and shed debris at high heat; abrasion can dull or strip them. Test a small underside area first. If the foil mars the finish, switch to a non-abrasive sponge and enzymatic cleaner.
Step-by-Step: the 10-Minute Foil-Ball Method
Remove the racks. Lay them across a sink, bath, or lined countertop. Run hot water for one minute to warm the metal; heat softens fats, making them less tenacious. Add a teaspoon of dish soap to create slip. Crumple a palm-sized ball of aluminium foil, compressing firmly until it’s dense with sharp micro-folds. Keep the surface wet at all times; re-wet if the ball drags or squeals.
Work section by section. Start with the front rungs, using short strokes to break the crust, then switch to longer sweeps to clear the loosened residue. Rotate the foil ball often so fresh edges meet new grime. For corners and solder joints, pinch the ball into a wedge for precision. If you hit a lacquered spot that looks glossy and untouched by heat, ease off; those areas usually clean with a wipe after the main scrub.
Rinse thoroughly. Feel for remaining tacky patches with your fingertips—texture tells you more than sight. Revisit any sticky zones with the same ball or a new one if it has gone smooth. Dry with a towel to prevent water spots, or slide the racks back into a warm oven for five minutes to flash-dry. If the rack belongs to a self-clean oven cycle, consult the manual before scrubbing.
What to Use With the Foil: Safe Solutions and Ratios
The foil does the heavy lifting, but the right partner liquid speeds everything. Mild alkalinity dissolves fats, while surfactants lift soils. You don’t need caustics for routine rack grime. Choose from these kitchen-safe options and mix in a jug before you start. Avoid strong bleach-ammonia mixes and never pair bleach with acids. Keep it simple, effective, and ventilated.
| Solution | Ratio | Best For | Caution |
|---|---|---|---|
| Hot water + dish soap | 1 tsp per litre | General grease, daily build-up | None; rinse well |
| Baking soda slurry | 3 tbsp + enough water to paste | Stubborn, carbonised patches | Rinse thoroughly to avoid film |
| White vinegar spritz | 1:1 with water | Deodorising, brightening after scrub | Do not soak foil in vinegar (reactive fizz) |
| Enzymatic cleaner | As labelled | Burnt proteins, dairy residues | Test on coatings first |
For the worst spots, dab on a thick bicarbonate paste, wait five minutes, then scrub with the foil ball. The alkali loosens bonds; the foil shears them. A quick post-scrub spritz of diluted vinegar neutralises residue and adds shine—let it fizz briefly, then rinse. Never seal acidic liquids and aluminium together in a closed container; the reaction can build pressure and create off odours.
Safety, Surfaces, and When Not to Use Foil
Know your rack. If it’s bright, silver, and slightly reflective, it’s likely chrome-plated steel—ideal for the foil method. If it’s matte-grey and labelled “self-clean” or has a black ceramic look, treat it as coated and avoid abrasion. When in doubt, a 10-second patch test under a rear rung is your insurance. If the area dulls, stop. Use a soft sponge and a degreaser instead.
Protect yourself and your kitchen. Wear light gloves; aluminium edges can be nippy, and hot water stings. Keep foil scraps away from heating elements and gas flames. Don’t block sink traps with flakes—use a strainer and bin the debris. If you prefer eco-conscious disposal, wipe the loosened gunk into kitchen roll before rinsing. The foil ball, once clean of food soils, can be recycled if your local scheme accepts scrunched foil.
Time it right. After roasting, wait until racks are warm, not hot. Heat softens grease; blistering heat burns fingers. Skip aggressive chemicals around rubber door seals and enamel trims. Never line the bottom of an oven with foil; it can reflect heat and warp components. If you’re tackling decades-old carbon, accept a two-pass approach: quick foil scrub now, a longer soak later with an enzymatic cleaner, then a light second scrub to finish.
You don’t need pricey gels or an overnight bath to restore shine to oven racks. A simple foil ball, a slick of soapy water, and smart technique cut through burnt-on grease in minutes, leaving chrome bright and the kitchen smelling clean rather than chemical. It’s hands-on, a little satisfying, and kind to budgets. Used thoughtfully, it’s safe for most uncoated racks and astonishingly efficient. Will you give the 10-minute foil-ball method a try next time you roast, or will you adapt it with your own favourite cleaning mix?
Did you like it?4.5/5 (27)