In a nutshell
- 🧠 Why it works: Cutting folded aluminium foil provides gentle micro-abrasion and burnishing that realigns the edge, clears residue, and refreshes bite in about 30 seconds.
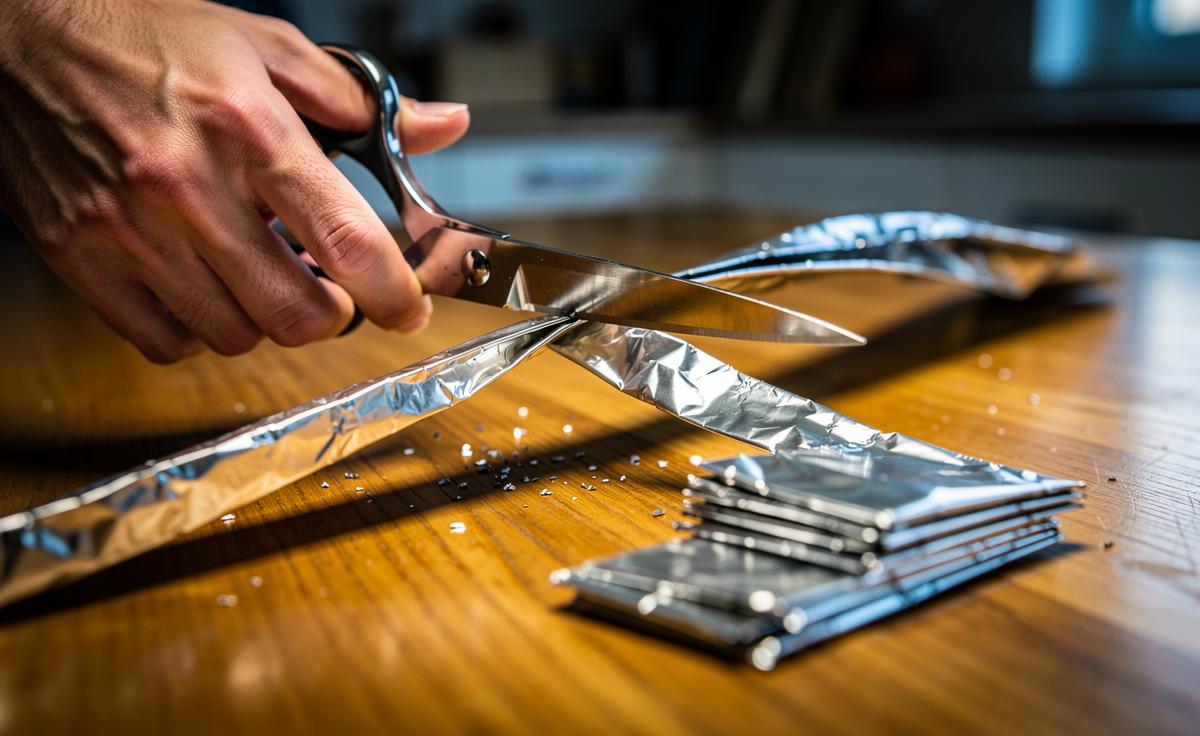
- ✂️ How to do it: Fold standard kitchen foil into 4–8 layers, make 10–20 full-length cuts from heel to tip, then wipe clean and add a drop of oil to the pivot.
- 🛡️ Safety and limits: Keep fingers clear, ensure proper pivot tension, and test on paper; this method polishes and aligns but won’t fix chips—use professional sharpening for damaged or premium shears.
- 📦 Best use cases: Ideal for household, craft, and kitchen scissors that face tape, packaging, and light materials; avoid on serrated blades or high-end tailor’s/hairdressing shears.
- 🧰 Maintenance tips: Pair the foil trick with good habits—don’t cut wire, store blades closed, keep them dry, and oil monthly—to extend scissor life and performance.
There’s a quietly brilliant trick hiding in your kitchen drawer: a strip of aluminium foil can revive dull household scissors in half a minute. It isn’t magic. It’s controlled, low-risk abrasion and burnishing that tidies the blade edge and restores bite. Fold, cut, repeat, and the tired edge gains crispness without specialised tools or a trip to the repair shop. This is a polish and alignment, not a full regrind, yet for wrapping paper, thread, herbs, or parcel tape, the improvement can be startling. Here’s how and why the method works, what to avoid, and the fastest way to get sharp results safely.
Why Aluminium Foil Sharpens Scissors in Seconds
When a scissor edge feels dull, it’s often due to micro-burrs, rolled steel, and grime rather than catastrophic damage. Cutting aluminium foil acts like a gentle micro-abrasive. The folded foil presents layered, lightly work-hardened surfaces that rub against the blade faces and edges, abrading tiny imperfections while also burnishing the bevel. With each snip, the blades meet a stack of thin metal that is soft enough to be safe, yet firm enough to polish.
Because the foil is thin, it distributes pressure evenly along the cutting stroke. That encourages contact across the full blade length and helps realign the apex, similar to how a honing steel straightens a knife. The aluminium’s oxide layer contributes mild abrasion, removing residues from tape adhesive or plant sap. In around 30 seconds, you can clean, align, and brighten the edge without removing meaningful amounts of steel, which is why the trick suits frequent, quick touch-ups.
Just as important is the scissor design. Household and craft pairs rely on proper shear angle and tight pivot tension to slice materials rather than wedge them apart. Foil cutting reasserts this geometry in practice: the contact, the glide, the light abrasion. The result isn’t a professional sharpen, yet it often feels like one for everyday jobs.
Step-by-Step: Fold, Cut, and Polish in 30 Seconds
Start with a sheet of kitchen aluminium foil roughly the size of A4. Fold it several times to create a compact strip. Four to eight layers is ideal; more layers increase firmness, which boosts polishing. Wipe your scissor blades clean, then open and close them through the foil, making full-length cuts from heel to tip. Aim for 10–20 cuts, varying the angle slightly to contact the entire bevel. Use the whole blade on every snip to keep wear even and the edge consistent.
Keep the motion smooth. If the scissors snag, lower the folds or retighten the pivot screw slightly to improve contact. After cutting, brush away aluminium flecks and wipe the blades with a soft cloth. A single drop of light oil on the pivot improves action and protects the steel. For paper or thread scissors, that’s usually enough. For kitchen or herb scissors, wash, dry thoroughly, and oil lightly to prevent corrosion.
| Item | Recommendation | Why It Helps |
|---|---|---|
| Foil thickness | Standard kitchen foil | Soft enough to be safe, abrasive enough to polish |
| Number of folds | 4–8 layers | Increases firmness and micro-abrasion |
| Number of cuts | 10–20 full strokes | Ensures uniform contact heel to tip |
| Final wipe | Cloth + drop of oil | Removes residue and reduces friction |
Do not use this method on serrated blades or high-end tailor’s shears with specialised grinds. For those, seek professional service. For everyday stationery, craft, and kitchen scissors, though, this routine is fast, tidy, and surprisingly effective.
Safety, Limitations, and When to Choose a Proper Sharpen
Safety first. Keep fingers away from the cutting path, and work on a stable surface. If the pivot is loose, tighten it before you begin; a wobbly blade scrubs rather than slices. Wear light gloves if you’re handling many foil strips. After polishing, check the edge with scrap paper, never your thumb. A sharp edge is quiet and clean through paper; a dull edge snags and tears.
Understand the limitation. Foil cutting primarily polishes and realigns. It won’t fix chipped edges, deep nicks, or badly worn bevels. It also can’t correct warped blades or mis-set pivots. If your scissors still chew through paper after 20 cuts, you likely need a proper sharpen or a replacement pivot washer. For premium tailoring shears or hairdressing scissors, avoid DIY methods; the steels and grinds are engineered for precision and demand professional stones or jigs.
For household pairs that face tape, cardboard, and packaging, the foil trick excels between full service intervals. It refreshes bite, clears sticky residues, and keeps the action smooth. Combine it with basic care: don’t cut wire, store blades closed, keep them dry, and oil the pivot monthly. Treat the foil method as preventive maintenance—little and often—rather than a once-a-year rescue. Your scissors will last longer, and you’ll spend less time wrestling with ragged cuts.
With a folded strip of aluminium foil and a handful of full-length snips, most dull household scissors regain crisp, everyday performance in under a minute. It’s quick, it’s tidy, and it respects the steel by removing very little of it. You’ll still want a professional sharpen for damaged edges or precision tools, but for daily life, this is the nimble fix that keeps you moving. Will you try the 30-second polish today—and if you do, which pair in your drawer most deserves a second life?
Did you like it?4.6/5 (21)