In a nutshell
- ✨ Olive oil delivers immediate luster by filling micro‑scratches and smoothing light scatter, deepening the wood grain without forming a film.
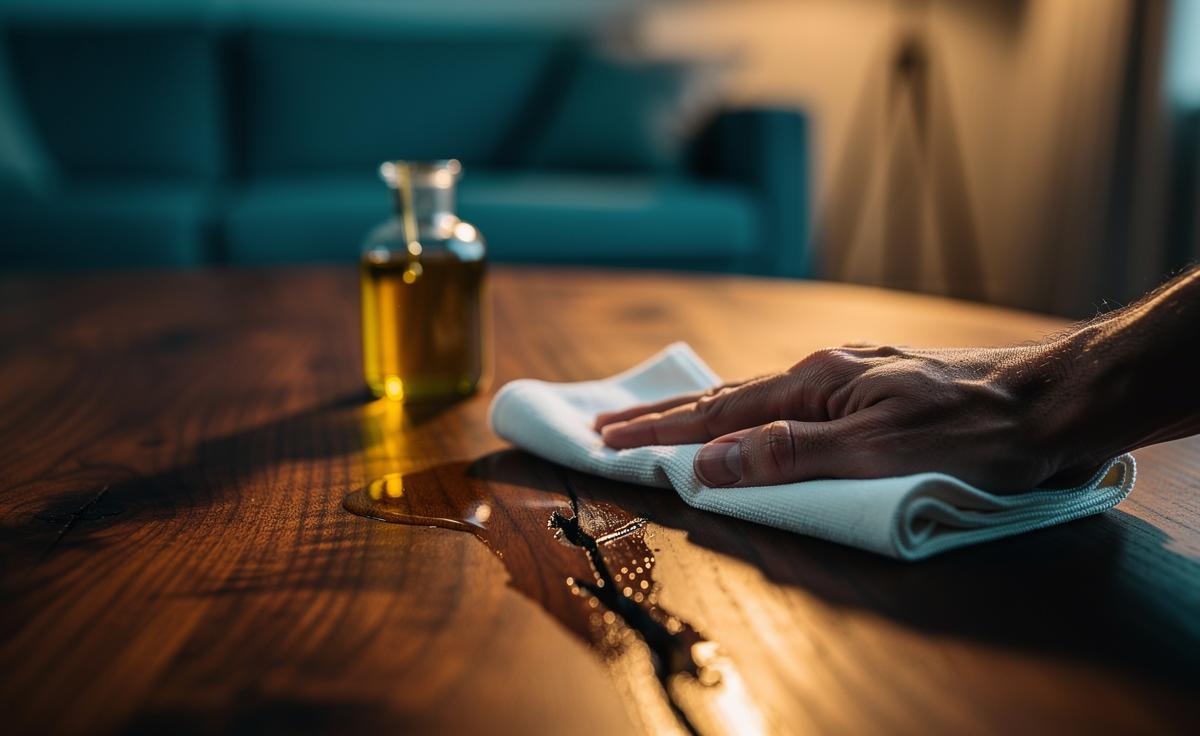
- 🧽 Follow a simple method: dust first, apply a few drops to a cloth (not the surface), work with the grain, then buff thoroughly to remove excess and create sheen.
- 🛑 Know the limits: olive oil is non‑curing, can get tacky if overused, and isn’t protection—test hidden areas and avoid unsealed antiques or very open‑pored woods.
- 🔄 Consider alternatives: mineral oil for neutral maintenance, beeswax balm for added body and smudge resistance, and silicone polishes for quick but complicated shine.
- 🧰 Treat it as a camera‑ready touch‑up: clean sticky areas first, keep coats thin, and remember it boosts appearance, not long‑term durability.
Kitchen cupboard to coffee table. It sounds unlikely, yet a splash of olive oil can coax a dull sideboard back to life in minutes. The trick is not magic but material science: oil slips into microscopic scratches, evens out scattered light, and makes grain look deeper, richer, well kept. Used sparingly, it’s a quick fix that flatters both hardwood veneers and solid timber. There are caveats. There are smarter techniques. And there are moments to put the bottle down. Here’s how to get that immediate luster without courting stickiness, dust, or long-term damage to your furniture’s finish.
Why Olive Oil Revives Wood So Quickly
When wood looks flat, it’s usually the finish scattering light because of micro‑scratches, dried wax, or minor abrasion. Olive oil has a refractive index close to many clear coats. It flows into those tiny valleys, bridges minute defects, and creates a smoother optical surface. The result is a cleaner reflection, which the eye reads as sheen. Capillary action helps the oil wet pores and edges, deepening colour and making the grain pop. That’s why a dull top suddenly looks richer after a few drops.
Olive oil also adds slip, so a buffing cloth glides, polishing the finish you already have. Crucially, it sits on or just under the surface; it is not a hard-drying finish like varnish or shellac. Olive oil does not cure into a protective film, it only beautifies what’s there. On sealed furniture, that’s perfect for a fast pick‑me‑up. On bare, open‑pored wood, too much oil may soak in and stay tacky. Always test on a hidden area first and use the thinnest possible application.
Practical Method for a Fast, Safe Shine
First, dust. Any grit under your cloth becomes a scratch maker. Use a clean microfiber to lift debris from corners and edges. Next, decant a teaspoon of olive oil into a small dish; you’ll need far less than you think. Lightly dampen a second microfiber or cotton cloth with the oil—just a couple of drops on the fabric, not directly on the wood. Less is safer, cleaner, and more controllable.
Work with the grain. Long strokes, feather-light pressure. You’re wetting the surface, not soaking it. On a tabletop, a pea-sized amount will often treat a quarter of the area. Pause, assess the reflection. If the cloth starts dragging, add a drop. If it slides with a silken feel, you’re at the sweet spot. Immediately buff with a dry, soft cloth to pick up surplus and burnish the surface. This is where the gloss happens.
For sticky patches or fingerprint haze, add a single drop of mild dish soap to warm water, wipe, then dry before oiling. Avoid vinegar on bare wood; keep any cleaner strictly diluted for finished surfaces. Optional twists: a squeeze of lemon zest over the cloth (not the table) for scent, or a whisper of beeswax balm after oiling for extra body. Never leave visible wet oil; always finish with a thorough buff.
Picking Oils, Add‑Ins, and Knowing When to Avoid
Not all oils behave alike. Extra virgin olive oil is slightly more aromatic and greener, with natural antioxidants that slow degradation. Refined olive oil is lighter in scent and colour. Both can refresh a finish, yet neither truly hard‑dries. If you want a neutral, non‑yellowing option for pale woods, consider food‑grade mineral oil. For a richer, longer‑lasting glow, a beeswax and oil blend gives body and better fingerprint resistance. Silicon polishes deliver instant shine but can complicate future refinishing. Choose for context, not craze.
Do not use olive oil on sticky, wax‑laden, or unsealed antique pieces that may require conservation. Avoid heavy application on open‑pored timbers (oak, ash) unless you plan a thorough buff and periodic maintenance. Be mindful of heat rings and water marks; oil beautifies but does not remove moisture trapped in a finish. And remember the smell: fresh oil is fine; rancid notes mean it’s past its best—don’t use it on furniture. For clarity, here’s a quick comparison:
| Product | Pros | Cons | Best For |
|---|---|---|---|
| Olive Oil | Immediate luster; deepens grain; readily available | Can attract dust if overused; may go tacky; slight yellowing on pale woods | Quick refresh of sealed finishes |
| Mineral Oil | Stable, odourless, food‑safe | Less rich glow; still non‑curing | Light woods, cutting boards, neutral maintenance |
| Beeswax Balm | Silky feel; better smudge resistance | Requires more effort; can build up | Show surfaces needing extra body |
| Silicone Polish | High gloss, very fast | Refinishing complications; potential smear | Short‑term display shine |
Used well, olive oil is a nimble, inexpensive way to revive tired timber. It restores optical smoothness, flatters colour, and buys time between deeper care sessions. Yet its strength is temporary brilliance, not long‑term protection. Think of it as a camera‑ready touch‑up rather than a finishing system. Keep the bottle small, the cloths clean, the coats thin, and the buffing generous. If the piece is valuable, delicate, or unfinished, take professional advice before any treatment. What cherished item in your home could benefit from a careful, two‑minute olive‑oil polish today?
Did you like it?4.5/5 (29)