In a nutshell
- ❄️ The ice cube neck roll de-puffs and sharpens the jawline via vasoconstriction and gentle lymphatic drainage, delivering a temporary “snatched” look best captured within 10–20 minutes.
- 🧭 Safe how-to: wrap the cube in cloth, glide along the sternocleidomastoid to the collarbone and beneath the jaw for 2–3 minutes, keep it moving, then seal with a humectant and lightweight moisturiser.
- ⏱️ Timing and tools: aim for 8–12 minutes pre-photo; pair with a chilled jade/stainless roller and a touch of caffeine gel, then finish with a satin primer for camera-friendly texture.
- ⚠️ Safety first: skip if you have cold urticaria, Raynaud’s, uncontrolled rosacea, eczema flares, neuropathy, or broken skin; avoid after microneedling and consult on timing post-fillers.
- 🔬 Evidence check: benefits are transient decongestion and tone changes—not collagen boosting—so treat cold as a quick, adjustable fast filter tailored to your skin.
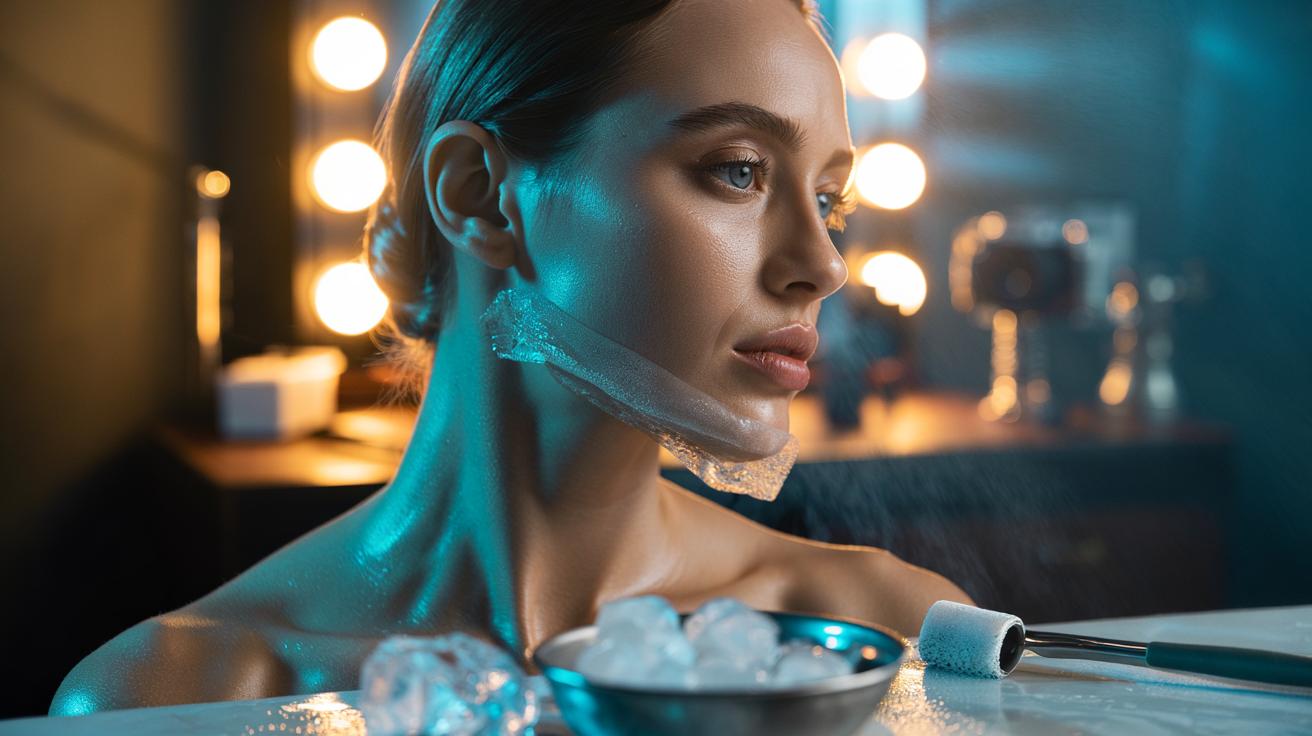
Minutes before a camera flashes, an ice cube can become the beauty team you never hired. The so-called ice cube neck roll is a quick, at-home trick that coaxes a crisper jawline, calmer skin and a brighter finish. By rolling cold along the neck and under the jaw, you tap into temporary vasoconstriction and fluid shifts that reduce puffiness and sharpen contours. Done right, it’s a low-cost, low-effort way to get that “snatched” look without makeup tricks. Here’s how the chill works on a physiological level, how to do it safely, and when to deploy it so your selfies, headshots or wedding photos look alert, lifted and photo-ready.
What Cold Does to Your Face in Minutes
Cold exposure prompts vasoconstriction, narrowing surface blood vessels. In practice, that temporarily reduces redness, minimises the look of pores and draws down oedema that blurs the jawline. Around the neck and jaw, a brisk, wrapped ice cube can push lingering fluid toward lymphatic drainage routes near the collarbone. The result is a cleaner mandibular angle and less morning puff. The effect is short-lived but can be striking in photos taken within 10–20 minutes. Some users also notice a fresher tone as cold reduces oiliness at the surface.
After the chill, a mild rebound vasodilation can encourage a natural glow, much like a quick cold rinse post-shower. Cooling the neck may also nudge the vagus nerve, subtly easing tension that makes the face read tight on camera. While the science is still evolving, cryotherapy and cold rolling are widely used backstage to calm skin and settle under-eye bags. The key is controlled cold: brief, guided, and never abrasive.
How to Perform an Ice Cube Neck Roll Safely
Wrap one ice cube in a thin muslin or paper towel—never apply bare ice directly for long. Sit tall, shoulders relaxed. Starting just under the ear, glide the wrapped cube along the sternocleidomastoid towards the collarbone for 5–10 seconds, then lift and repeat, avoiding dragging. Do 3–5 passes per side, then trace beneath the jaw from chin to ear in short, feather-light strokes. Keep the cube moving to avoid a cold burn. Total contact time should stay under two to three minutes.
Pat dry, then seal the effect with a light humectant and a non-greasy moisturiser; heavy occlusives can flatten the lift. If you plan makeup, wait two minutes for equilibrium. For sensitive skin, pre-apply a simple barrier serum to reduce sting. Stop immediately if you feel numbness, stinging, or blanching that persists. Use the technique as a quick pre-photo reset, not as a daily endurance ritual.
Timing, Tools, and Variations for a Snatched Look
For most faces, the sweet spot sits at 8–12 minutes before the shot: soon enough to catch the de-puff, not so soon that rebound warmth turns to shine. Pair the neck roll with a chilled jade roller or stainless tool under the eyes, sweeping from inner corner to temple for 30 seconds each side. A dab of caffeine gel can amplify decongestion. If you’re outdoors, keep a recyclable ice pack wrapped and ready; in a pinch, a bag of frozen peas works, provided it’s clean and insulated by cloth. Light pressure wins—let temperature do the heavy lifting.
Finish with a satin primer to preserve texture rather than smother it. Photographers often advise a matte T-zone but a natural sheen on the high points. Cold can also help lip definition: a 5-second glide along the vermilion border curbs swelling that blurs crisp lines. If you swell easily, test the routine on a non-event day first.
| Tool | Prep/Temp | Primary Benefit | Time |
|---|---|---|---|
| Wrapped Ice Cube | From freezer; thin cloth wrap | Vasoconstriction, de-puff, jaw definition | 2–3 minutes total |
| Chilled Jade/Stainless Roller | Fridge, not freezer | Lymphatic drainage, under-eye smoothing | 1–2 minutes |
| Caffeine Gel | Pea-sized under eyes | Fluid reduction, brightness | 2–5 minutes |
Who Should Skip It and What the Science Still Debates
Avoid ice rolling if you have cold urticaria, Raynaud’s, uncontrolled rosacea, eczema flares, neuropathy, or broken skin. Take care after in-clinic treatments: skip cold massage for at least 48 hours post microneedling, and ask your practitioner about timing after fillers or neuromodulators. If your skin barrier is compromised, prioritise repair before experimenting. For very reactive complexions, try fridge-cool water compresses instead of ice.
Claims of collagen “boosting” from brief ice contact are overstated; evidence supports temporary decongestion and colour changes, not structural lifting. Still, in the real world of portraits and events, transient gains are exactly what’s needed. The technique is inexpensive, accessible and, when used sparingly, gentle. Think of cold as a fast filter for your face—fleeting but effective when timed well. Keep expectations grounded, log your own results, and adjust pressure, timing and products to your skin’s temperament.
An ice cube, a cloth and two minutes can reset a puffy morning into a camera-ready moment. By pairing controlled cold with light drainage strokes and smart timing, you carve crisper lines, soften redness and capture that coveted snatched look—no contour palette required. The trick is restraint: quick passes, steady breath, then lock it in with minimal skincare. For special occasions or everyday confidence checks, it’s a reliable backstage hack. Will you test a neck roll before your next photo, or build your own chilled toolkit to see which version gives you the sharpest shot?
Did you like it?4.6/5 (23)