In a nutshell
- 🍯 Use a lightly crumpled aluminium foil disc directly on the sugar inside an airtight glass jar to create a stable microclimate that keeps brown sugar soft for weeks.
- 🧪 Brown sugar is hygroscopic; the foil limits air exchange and evaporation, maintaining the ideal moisture balance (about 60–75% RH) without adding flavours or contaminants.
- 🥣 Step-by-step: break clumps, leave 1–2 cm headspace, add the foil disc; for dry sugar, use a tiny vented foil sachet with barely damp tissue for 24–48 hours, then remove.
- 🛡️ Safety first: avoid bread or fruit, watch for condensation, discard if mould appears, and prioritise consistency—quick openings and firm resealing preserve softness.
- 🔧 Troubleshooting: revive with short microwave bursts (foil removed) or a brief low oven, then maintain with the foil method; add a terracotta sugar saver above the foil and downsize the jar if clumping returns.
Brown sugar is a kitchen darling until it turns stubborn and rock-hard. The culprit isn’t age, it’s moisture loss from the molasses coating that gives brown sugar its flavour and soft chew. The fix is surprisingly simple: a tight kitchen jar and a clever layer of aluminium foil to regulate humidity. This creates a tiny, stable microclimate that keeps crystals supple for weeks, not days. In tests at home and in professional kitchens, the method proves cheap, tidy, and repeatable. By controlling evaporation and limiting airflow, you preserve the sugar’s natural moisture balance—without adding flavours or contaminants. Here’s how it works and how to get it right first time.
Why Brown Sugar Hardens — And How Foil Helps
Brown sugar’s signature softness comes from a thin film of molasses, a syrup rich in water and minerals. Left exposed to air, that water migrates and evaporates. The sugar compacts, then clumps, then sets like a brick. An airtight jar slows this process, but headspace still matters. Every time you open the lid, you exchange the jar’s humid air for dry room air. The result? Gradual moisture drift and crusty edges. Preventing that exchange is the heart of the solution.
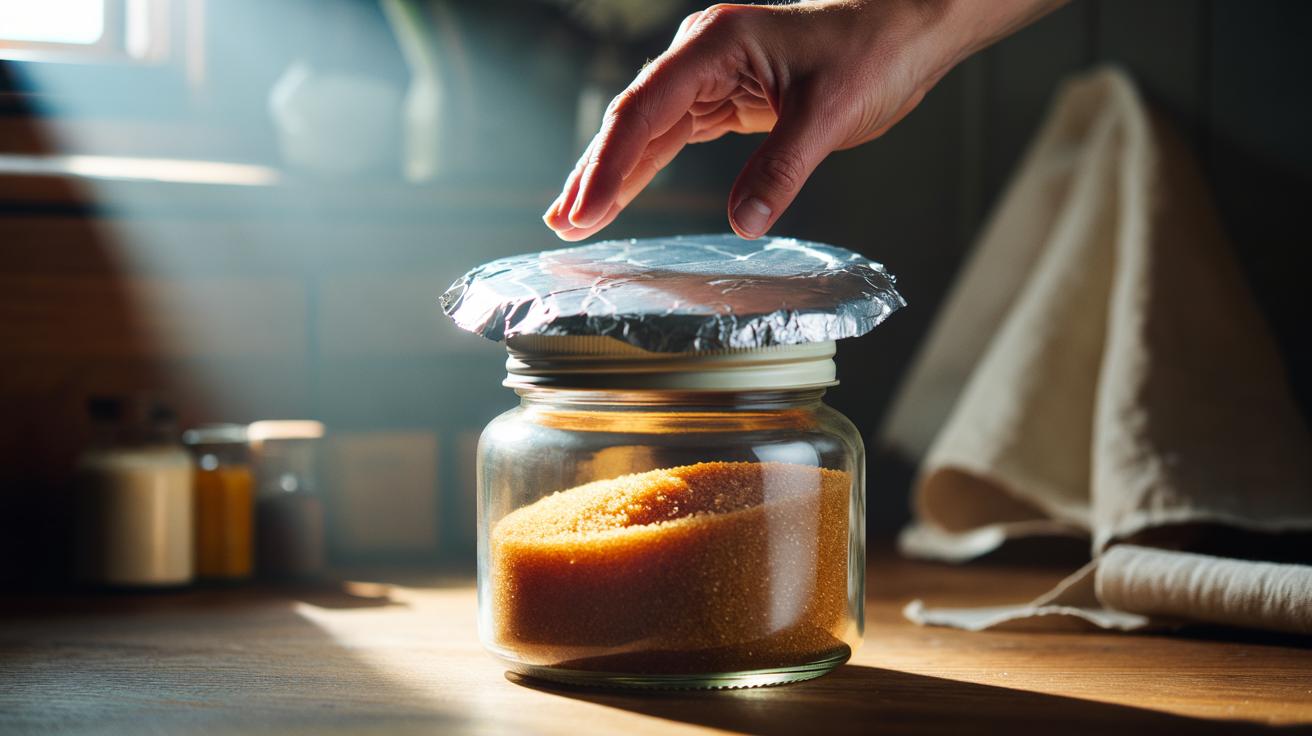
A simple disc of aluminium foil, placed directly over the sugar before you seal the jar, reduces the volume of air in contact with the granules and acts as a humidity buffer. Crumple the foil lightly, then flatten it; those micro-wrinkles create tiny channels so the sugar can “breathe” without losing its lifeblood. Think of it as a duvet for your sugar: insulation against sudden temperature and humidity swings. Moisture balance stabilises, clumps stop forming, and the sugar stays pressable and pourable.
Because the foil sits between the sugar and the lid, it also shields against odours and stray condensation. That simple barrier extends freshness, suppresses crust formation, and buys you weeks of soft, ready-to-use brown sugar for baking, sauces, and rubs.
Step-by-Step: Jar-and-Foil Method for Weeks of Freshness
Choose a clean, dry, airtight glass jar with a reliable seal. Fill it with brown sugar, breaking up any existing clumps, and leave 1–2 cm of headspace. Cut a round of foil to fit the jar’s inner diameter. Lightly crumple, then smooth the foil and lay it directly on the sugar’s surface, pressing gently around the edges so it hugs the contour. This reduces exposed surface area and curbs evaporation between uses. Seal the lid firmly.
For sugar that’s already dry, craft a tiny, vented moisture source that never touches the sugar. Wrap a postage-stamp-sized piece of barely damp kitchen paper in foil, then prick 3–5 pinholes with a toothpick. Place this sachet on top of the foil disc, under the lid. It releases a whisper of humidity without wetting the sugar. Check after 24 hours; if the sugar softens, remove the sachet and keep the foil disc in place.
Open the jar briefly when scooping, then reseal. Store in a cool cupboard, away from direct heat. Skip bread slices or apple wedges; they introduce odours and a mould risk. A terracotta sugar saver is a fine alternative—just dry it thoroughly after soaking and keep it above the foil, not in contact with the sugar. Consistency is key: the less air you swap in and out, the longer the softness lasts.
Science and Safety: Managing Humidity Without Clumps or Mould
Brown sugar is hygroscopic, seeking equilibrium with surrounding air. Aim for a jar microclimate akin to 60–75% relative humidity; below that range, the molasses dries, above it, you court stickiness or condensation. The foil’s job is to dampen shocks. It narrows the gap between the sugar’s surface and the air, so even when you open the lid, conditions rebound quickly after you reseal. The trick isn’t to add lots of moisture but to stop losing the moisture you already have.
Food safety matters. Avoid liquid water contact. Skip fresh fruit. Keep any damp sachet small, temporary, and fully wrapped in foil with tiny vents, replacing it only if needed. Watch for fogging on the jar wall; that’s a warning sign of excess humidity. If you ever see visible mould, discard the sugar and sanitise the jar.
| Parameter | Target | Watch For | Action |
|---|---|---|---|
| Container | Airtight glass jar | Loose lids, odours | Replace seal; clean thoroughly |
| Foil Disc | Lightly crumpled, snug fit | Gaps, torn foil | Refit or replace foil |
| Humidity Aid | Tiny, vented foil sachet | Condensation, stickiness | Remove sachet immediately |
| Check Interval | 7–14 days | Hard edges, odour | Refresh foil, brief rehydrate |
Never let visible water or fruit touch the sugar—softness achieved this way is short-lived and risks spoilage. The foil-and-jar microclimate delivers steadier, safer results.
Troubleshooting and Quick Rescue Techniques
If your sugar is already solid, don’t panic. Tip it into a bowl and break the block with the back of a spoon. Return it to the jar, add the snug foil disc, and use a tiny vented foil sachet for 24–48 hours. For urgent bakes, microwave a portion in a microwave-safe container with a separate cup of hot water beside it for 10–15 seconds—remove any foil first—then transfer back to the jar and apply the foil method to maintain softness. Repeat short bursts if needed, checking texture between cycles.
Another gentle technique: a low oven at 110°C for 5–8 minutes on a tray covered loosely with foil (no direct heat browning), then cool and jar. Avoid overbaking; melted edges will recrystallise into rocks. If you keep a terracotta sugar saver, soak it for 5 minutes, pat dry thoroughly, and place it above the foil in the jar so it humidifies the headspace, not the crystals themselves. Softening is only half the job; sustaining that texture is where the foil barrier earns its keep.
If clumps recur, your jar may be too large for the volume of sugar. Downsize the container, refresh the foil, and store away from the hob. Short openings and firm resealing extend the life of your carefully calibrated microclimate.
Handled smartly, brown sugar can stay supple for weeks with little fuss. The jar-and-foil approach is low cost, quick to set up, and scientifically sound because it stabilises humidity rather than chasing it with risky add-ins. Stop evaporation, minimise air exchange, and you’ll sidestep clumps, crusts, and wasted ingredients. Whether you bake daily or sporadically, a simple foil disc under a tight lid keeps caramel notes intact and texture spoon-ready. What tweak will you try first—downsizing your jar, adding a vented sachet for a day, or adopting a terracotta saver above the foil to fine-tune your kitchen’s conditions?
Did you like it?4.3/5 (21)