In a nutshell
- 🔬 The redox reaction converts silver sulphide back to silver as aluminium acts as a sacrificial anode; heat and bicarbonate of soda speed a non-abrasive restoration.
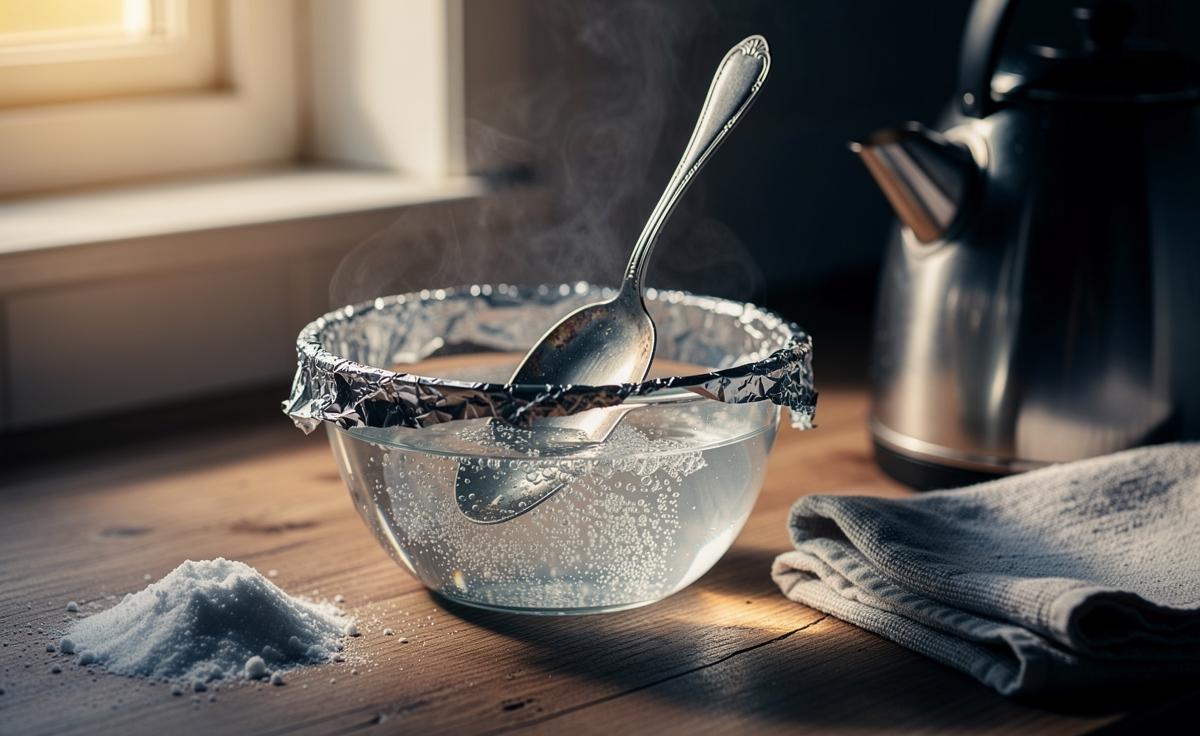
- 🛠️ Method: line a bowl with aluminium foil, add hot water and bicarbonate of soda (plus a pinch of salt), ensure contact, wait minutes, then rinse, dry, and buff.
- ⚠️ Suitability: great for solid silver and many silver plate items, but avoid porous stones, glued parts, lacquers, or pitch-filled pieces; it can lift intentional patina.
- 💷 Benefits: fast (2–10 minutes), low-cost, and lower-waste versus abrasive polishes or professional cleans; use pastes for spot work, pros for valuable antiques.
- 📦 Upkeep: store silver dry and away from sulphur sources, buff after washing, and refresh heat or bicarb for heavy tarnish to maintain that instant shine.
There’s a curious domestic alchemy that turns a dull, greyed spoon back into a mirror in minutes. The secret? Ordinary aluminium foil, a kettle of hot water, and pantry staples. It looks like magic. It isn’t. It’s clever chemistry you can do in a washing-up bowl, reclaiming heirloom lustre without elbow grease or expensive pastes. This is a non-abrasive reversal of tarnish rather than mere polishing, which is why the shine seems to return so suddenly. In an age of lab-made solutions and boutique kits, the humble foil trick feels both thrifty and oddly thrilling, because it works, it’s fast, and you can see the change happen before your eyes.
The Science Behind the Foil Trick
Silver doesn’t rust, but it does darken. The culprit is silver sulphide (Ag2S), formed when silver meets sulphur compounds in air, foods, or rubber bands. The foil method sets up a tiny galvanic couple between silver and aluminium. In hot water with an electrolyte such as bicarbonate of soda (baking soda), electrons travel from aluminium to the tarnish, reducing silver sulphide back to metallic silver while aluminium is oxidised. In chemical shorthand, you’re witnessing a redox reaction that transfers sulphur from silver to aluminium.
Because the tarnish is chemically converted, not scraped off, the underlying metal is preserved. That’s the crucial difference. Instead of thinning your silver with abrasion, you restore it. Warmth speeds the reaction; dissolved ions in the water carry charge; the crumpled foil maximises contact area. The faint odour some people notice? That’s the chemistry talking, not damage. It’s the same principle jewellers learn early: use a more reactive metal as a sacrificial anode, and let physics do the polishing you can’t see.
How to Use Aluminium Foil to Polish Silver
Line a heatproof bowl with aluminium foil, shiny side up for better contact. Add hot—not boiling—water. Dissolve a heaped tablespoon of bicarbonate of soda per litre, and, if you like, a pinch of salt to boost conductivity. Place tarnished silver so it touches the foil. Wait. That’s it. In seconds to a few minutes, the brown or rainbow cast fades. Lift, rinse in clean water, pat dry with a soft cloth. No grinding. No loss of metal. Just the kind of instant gratification usually reserved for adverts.
Heavier sulphide layers can take longer. Reheat the solution or refresh the bicarb if progress stalls. For crevices, reposition pieces to improve contact with the foil. Patience helps, but technique matters more: good immersion, lots of foil surface, and water hot enough to steam but safe to handle. If you’re cleaning a full canteen, work in batches. Keep separate cloths for drying and buffing to avoid re-depositing grime. When you’re done, store silver dry, away from rubber bands and wool felt, which release sulphur. A quick buff after washing-up keeps that hard-won gleam.
When It Works, When It Doesn’t
Most solid silver and many plated items respond beautifully. Teaspoons, serving forks, candlesticks, even chains. But there are caveats. Don’t immerse pieces with porous stones, glued components, or fragile lacquers. Opals, turquoise, pearls, and antique finishes can suffer in hot alkaline baths. Painted handles and hollow pieces with pitch fillings are also risky. If in doubt, test a hidden spot or consult a jeweller.
Consider patina. Those darkened recesses on chased silver are deliberate; they add depth and age. The foil method can lift that contrast. Decide whether uniform brightness is desirable before you dunk a Victorian platter. On silver plate, the process is generally kinder than abrasives, yet repeated cycles can expose base metal where plating is already thin—typically on edges or monograms. Watch for uneven colour as an early warning. Finally, tarnish from chlorides or heavy sulphide build-up might require multiple rounds or a final mild hand-polish. The trick is powerful, not omnipotent. Good judgement finishes the job.
Cost, Time, and Eco Benefits Compared
The appeal isn’t only sparkle. It’s pragmatism. The foil method is cheap, quick, and light on the planet. You’re using household heat, tap water, and a spoon of bicarbonate of soda. No solvent fumes. No micro-abrasives down the drain. For regular upkeep, the savings compound: less labour, fewer products, fewer trips to a professional for routine maintenance. Yes, pastes and cloths still have their place—especially for isolated spots or display patina—but for a drawer full of cutlery before a dinner party, the calculus is easy.
| Method | What It Does | Best For | Typical Time | Main Risks |
|---|---|---|---|---|
| Foil + Bicarbonate Bath | Chemically reverses sulphide tarnish | Bulk items, frequent maintenance | 2–10 minutes | May lift intentional patina; avoid porous stones |
| Abrasive Polish | Physically removes tarnish and metal | Spot treatment, stubborn patches | 10–30 minutes | Thinning over time; residue in crevices |
| Professional Clean | Controlled techniques, repairs possible | Valuable antiques, complex pieces | Days | Cost; unnecessary for routine cutlery |
In short, choose the chemistry when time, cost, and conservation matter most. Save pastes for edges and engraving where a cloth can finesse the finish, and reserve the bench jeweller for pieces with history or damage.
Aluminium foil, a kettle, and a pinch of pantry science: that’s all it takes to strip away years and reveal the silver you remember. The method is forgiving, repeatable, and astonishingly swift, yet it rewards care—choose the right items, control the heat, and protect patina when character counts. Let the reaction do the work, not your wrists. Next time a family dinner looms and your spoons look sorry for themselves, you’ll know what to do. Will you reach for the foil and turn your sink into a chemistry set, or will you keep the patina as living proof of meals and memories?
Did you like it?4.5/5 (24)