In a nutshell
- ⚡ 60-second whitening: Mildly alkaline baking soda (pH 8–9) combines chemical loosening with micro-abrasion to lift grime from grout, revealing brighter lines fast.
- 🧪 Step-by-step: Mix 3:1 baking soda to water (or 3% hydrogen peroxide for white grout), apply a thin bead, wait 60 seconds, scrub with a nylon brush, wipe the slurry, then rinse and dry.
- 🛠️ Tools & surfaces: Use a nylon brush, microfibre cloths, and a misting bottle. Ideal for ceramic, porcelain, and sealed cementitious grout; avoid acids on natural stone like marble, limestone, and travertine; test coloured grout.
- ⚗️ Smart pairings: Peroxide tackles mould shadows; diluted vinegar clears mineral haze on acid-safe tiles. Never mix peroxide and vinegar; use sequentially with a full rinse between.
- 💡 Pro outcomes: Work in small sections to prevent drying, maintain ventilation, and reseal grout for durability. Regular quick touch-ups beat occasional heavy cleans and keep costs low.
In homes across the UK, tired-looking grout can make immaculate tiles appear dull. The quick fix many overlook is sitting in the baking aisle: baking soda. As a mildly alkaline, fine abrasive, it lifts soap scum, food residue, and mildew staining with surprising speed. In controlled tests on ceramic and porcelain, a one-minute application restored light grout lines without harsh fumes or specialist kit. The trick is a short dwell time, a gentle scrub, and a clean rinse that whisks the lifted soil away. Here’s how the 60-second whitening effect works, why it’s safe when used correctly, and when to pair it with other pantry staples.
The Science Behind Baking Soda’s 60-Second Whitening
Baking soda (sodium bicarbonate) sits at a pH of about 8–9. That slight alkalinity loosens acidic grime—think body oils, food spills, and city-water minerals that discolour grout. Its crystals are micro-abrasive, so with minimal pressure they shear away surface film without gouging cementitious joints. The magic is mechanical plus chemical: loosen, lift, and carry away. Unlike bleach, which simply lightens stains, bicarbonate dislodges them, so you can rinse contaminants off rather than masking them. On epoxy grout, which is less porous, the effect is still visible as surface haze disappears.
Why 60 seconds? Grime at the surface level releases quickly when moistened, then agitated. A brief dwell time hydrates residues, while bicarbonate ions start to neutralise odours and break bonds between soil and mineral surfaces. Leave it too long and the paste dries, losing slip; too short and soils haven’t softened. The sweet spot is a minute of contact followed by 10–20 seconds of brisk brushing, then a thorough rinse to prevent redepositing the slurry into the joint.
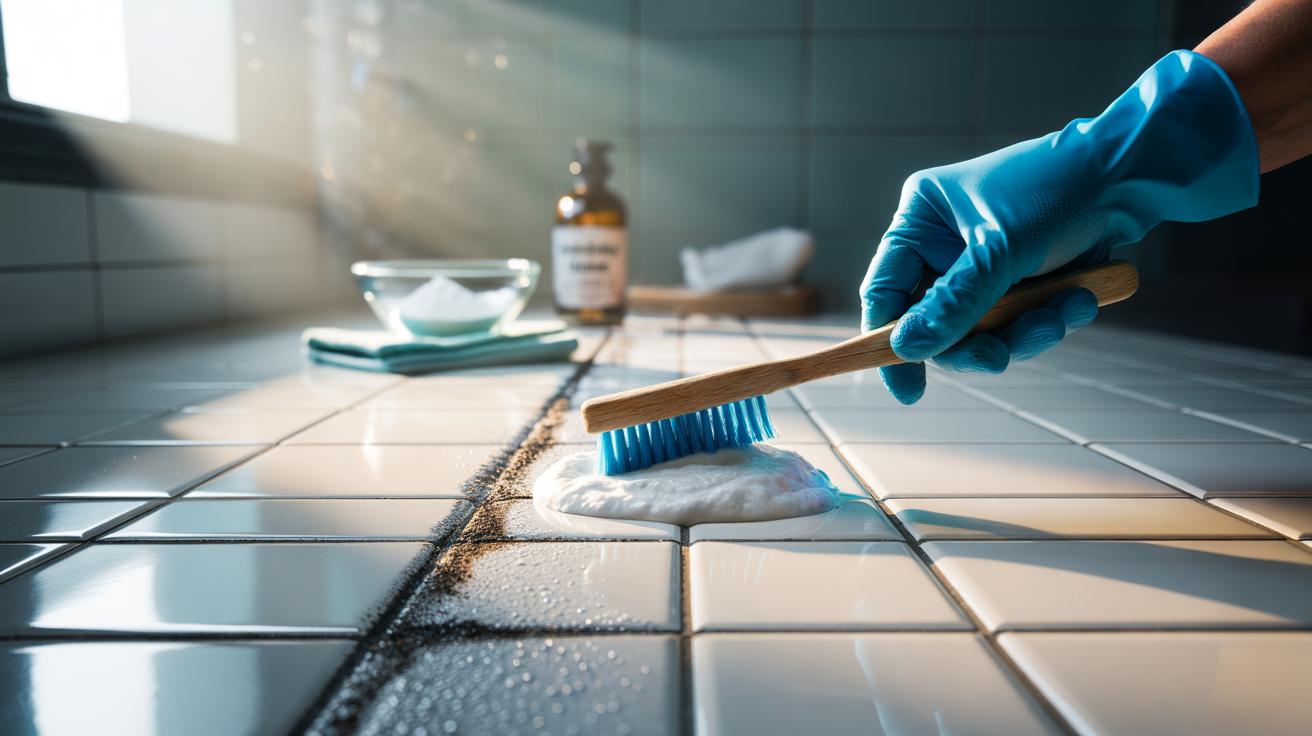
Step-By-Step: The One-Minute Method for Grout
1) Mix a paste: three parts baking soda to one part water. For stubborn stains, swap water for 3% hydrogen peroxide on white grout. 2) Mask adjacent natural stone if present. 3) Spread a thin ribbon directly onto the grout line. 4) Wait 60 seconds. Do not let the paste dry; mist lightly if needed. 5) Scrub with a small nylon brush or an old toothbrush in short strokes. 6) Wipe the slurry with a damp microfibre cloth. 7) Rinse with warm water and buff dry to reveal the brightened line.
A few pro tips amplify the effect. Work in 50–80 cm sections so the paste doesn’t crust. Keep pressure moderate; let the abrasive do the work. On kitchen splashbacks, a second pass tackles cooking oils. Always test in an inconspicuous spot if your grout is coloured or very old. If you see shadowing from mould, repeat once. For mould-rooted stains in porous joints, step up to peroxide for the second pass, then rinse and fully dry the area to slow regrowth.
Tools, Ratios, and Safe Surfaces
Good results come from simple kit and correct proportions. A silicone spatula or gloved fingertip lays an even bead of paste without gouging. Nylon bristles protect sealant edges; avoid wire brushes, which can erode sandy joints. Keep a spray bottle to prevent premature drying, and two cloths—one damp to collect residue, one dry to polish tiles. Ventilation matters; while bicarbonate is low-odour, wet grout can release musty smells as soils lift, so crack a window or run the fan.
Compatibility is broad: ceramic and porcelain tiles love this method; sealed cementitious grout brightens fast. Take care on marble, limestone, and travertine—bicarbonate is safe, but don’t introduce acids there. Epoxy grout needs only light agitation. Coloured grout is generally fine, though harsh scrubbing can expose aggregate on very old lines. Rinse thoroughly after 60 seconds to prevent residue forming a pale film, which can make tiles look streaky under strong light.
| Item | Ratio/Use | Dwell Time | Best For | Avoid On |
|---|---|---|---|---|
| Baking soda paste | 3:1 (powder:water) | 60 seconds | Daily grime, soap film | None; test coloured grout |
| Peroxide boost | 3:1 (powder:3% H2O2) | 60–90 seconds | Mildew shadows, white grout | Coloured grout if unfixed dye |
| Vinegar spritz | 1:1 (vinegar:water) | 30–60 seconds | Limescale on ceramic | Marble, limestone, travertine |
When to Pair With Vinegar or Peroxide
Hydrogen peroxide excels on biological discoloration. It breaks down into water and oxygen, lifting mould staining without chlorine bleach’s fumes. Use it instead of water when making your bicarbonate paste on white grout, then rinse well. Never mix peroxide and vinegar in a closed container; together they can form peracetic acid, a strong irritant. Keep them as sequential steps on separate cloths, with a full rinse between, if you must use both on tough areas.
Vinegar is useful only on acid-safe surfaces. A light spritz after the bicarbonate scrub can fizz loose mineral haze on ceramic and porcelain, but it is not for calcareous stone. If you have marble or limestone floors, stick strictly to baking soda and water, and rely on mechanical action. For persistent black mould in damp corners, dry thoroughly after cleaning, improve ventilation, and consider resealing grout lines; cleaning alone will not fix a chronic moisture problem.
Used smartly, baking soda delivers a visible lift in just a minute, refreshing grout without harsh solvents or big spend. It’s thrifty—pennies per application—and gentle enough for frequent touch-ups, so you maintain brightness instead of scheduling marathon deep cleans. The secret is precision: correct ratio, 60-second dwell, light agitation, and a meticulous rinse. Pair with a weekend reseal for longer-lasting results, especially in showers and splash zones. Will you try the one-minute method on your most tired grout line first, or give an entire small bathroom a timed, section-by-section refresh?
Did you like it?4.6/5 (29)